🌱 How To Decorate A Christmas Tree Steps
There’s a special magic that fills the air when the Christmas tree lights up, isn’t there?
I remember my first solo tree decorating adventure, a small apartment tree that felt like a towering forest.
This guide shares the practical steps and cozy design secrets I’ve learned over many joyful seasons, ensuring your tree becomes a heartwarming focal point.

Quick Overview
Transforming a simple evergreen into a dazzling centerpiece is a rewarding holiday tradition. This guide walks you through each stage, from planning your festive vision to adding those final, sparkling touches.
- Time needed: 2-4 hours (depending on tree size and detail)
- Difficulty: Beginner
- What you’ll need: Christmas tree (real or artificial), lights, garlands/ribbons, ornaments, tree topper, tree skirt/collar, step stool, gloves (for real trees).
Step-by-Step Instructions
Step 1: Choose Your Tree and Layout Your Space
Before any decorating begins, consider where your tree will live. A cozy corner or a grand window spot will dictate the tree’s size and how much light it receives, influencing its overall glow.
Think about the room’s current furnishings. You want your tree to complement the existing aesthetic, not overwhelm it. Clear the area completely to give yourself ample room to work.
If you’re using an artificial tree, assemble it according to the manufacturer’s instructions. For a real tree, place it in a sturdy stand and ensure it’s watered and stable.
Pro Tip: Fluffing an artificial tree is crucial. Gently spread out each branch and individual tip, working from the inside out, to create a fuller, more natural appearance. This step significantly impacts the final look.
Step 2: String Your Lights with Care
Lights are the soul of your Christmas tree, setting the entire mood. Begin at the bottom of the tree, near the trunk, and work your way up, weaving the lights deep into the branches.
Wrap the lights around each main branch, moving outwards and then back towards the trunk before moving to the next branch. This technique ensures an even glow from the inside out.
Use approximately 100 mini lights per foot of tree height for a truly luminous effect. Choose warm white lights for a classic, cozy glow, or opt for multi-colored lights for a playful, vibrant display.
Pro Tip: Always test your lights before you start stringing them. This saves you from the frustration of discovering a dead strand halfway through your decorating process.
Step 3: Drape Garlands and Ribbons
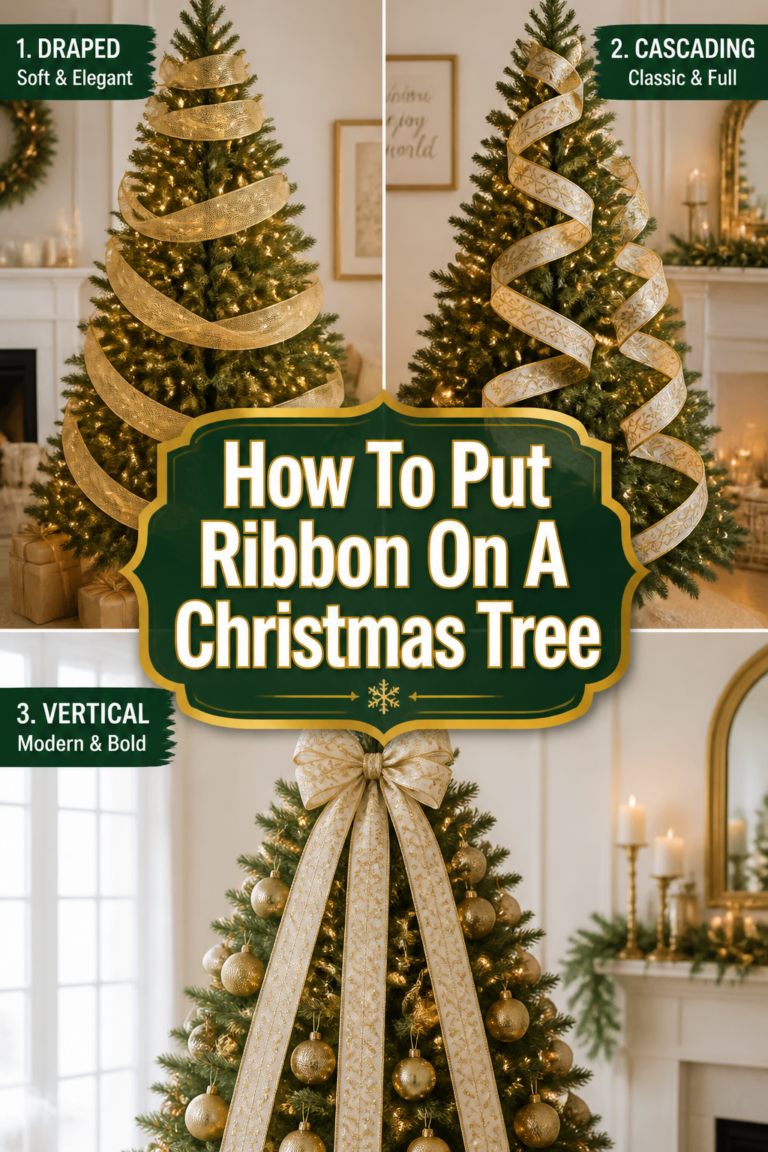
Garlands and ribbons add texture, depth, and a touch of elegance to your tree. Start with heavier garlands, like beaded strands or thick fabric ribbons, placing them deeper within the branches.
Drape them loosely and organically, letting them fall naturally. Avoid wrapping them too tightly, as this can make the tree look stiff and constrained.
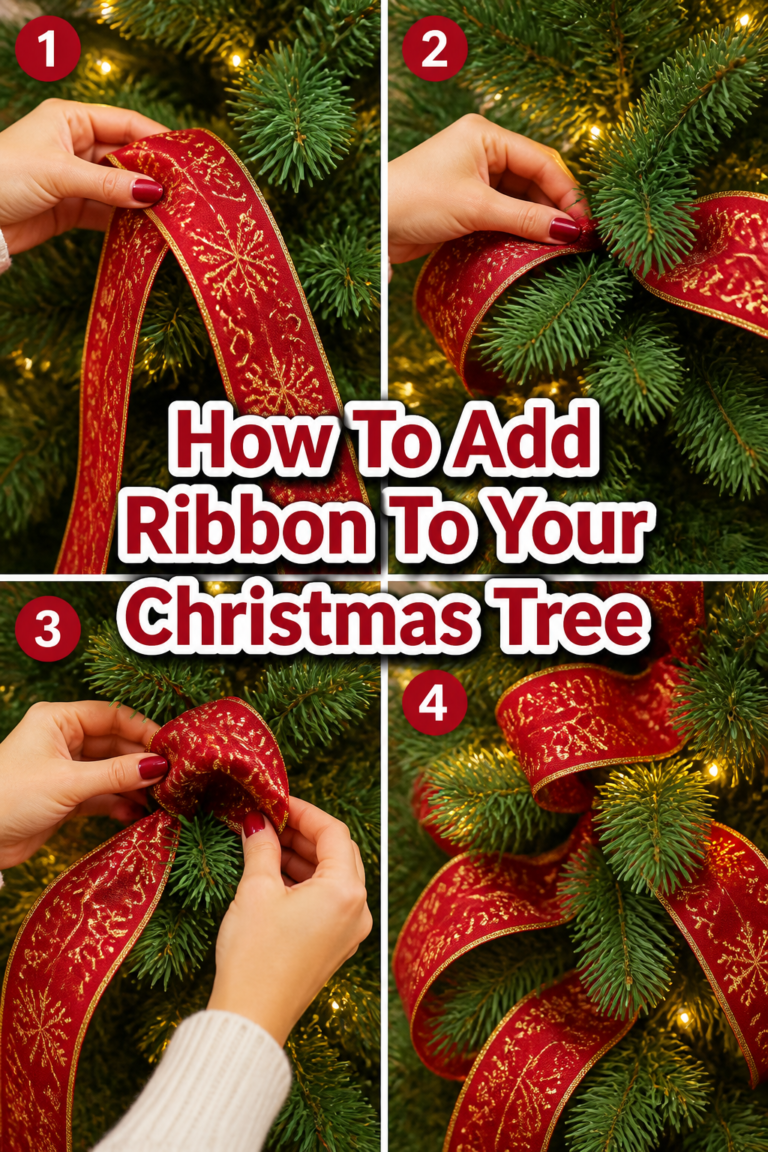
For ribbons, weave them gently through the branches, letting them cascade downwards in soft, flowing patterns. You can use multiple types of ribbon for added interest and dimension.
Pro Tip: Cut longer pieces of ribbon (around 6-8 feet) and tuck one end deep into the tree, letting the rest drape. Repeat this around the tree for a more seamless, professional look than wrapping one continuous piece.
Step 4: Place Your Ornaments Thoughtfully
This is where your tree’s personality truly shines. Begin with your largest, most impactful ornaments, placing them evenly around the tree, deeper within the branches to create visual anchors.
Next, distribute your medium-sized ornaments, ensuring a balanced spread of colors and shapes. Step back frequently to assess the overall balance and adjust as needed.
Finally, hang your smallest and most delicate ornaments on the tips of the branches. Mix in sentimental family heirlooms with newer, themed pieces to tell a beautiful story.
Pro Tip: Cluster small groups of 2-3 similar ornaments together on one branch for a fuller, more curated look. This adds visual weight and interest, especially if you have many smaller decorations.
Step 5: Crown Your Tree with a Topper
The tree topper is the grand finale, drawing the eye upwards and completing your tree’s silhouette. Choose a topper that complements your tree’s theme and scale.
Ensure your tree topper is securely fastened to the top branch. You might need to reinforce the branch with floral wire or a small dowel rod if your topper is particularly heavy.
Whether it’s a traditional star, an angelic figure, or a whimsical bow, the topper should feel like the perfect celebratory exclamation point for your festive creation.
Pro Tip: If your tree topper is difficult to reach, attach it before placing all the ornaments. This avoids accidental bumps and falls, keeping your precious decorations safe.
Step 6: Add the Finishing Touches and Surroundings
Complete your tree’s base with a beautiful tree skirt or collar. This not only covers the stand but also provides a lovely backdrop for your gifts.
Arrange your wrapped presents around the base, choosing gift wrap that complements your tree’s color scheme for a cohesive look. This extends the festive aesthetic beyond the tree itself.
Consider adding other cozy elements to the surrounding space, like soft throws, scented candles, or twinkling fairy lights on a nearby mantel. These details enhance the warm, inviting atmosphere.
Pro Tip: Place a mirror opposite your tree if possible. It reflects the lights and ornaments, making your tree appear even grander and doubling its festive glow.
Common Mistakes to Avoid
Skipping the Fluffing Step
Many people rush through assembling an artificial tree, leaving the branches compressed. This results in a sparse, unnatural-looking tree that no amount of decorating can fully fix.
Always take the time to individually spread and shape each branch and tip. This crucial step creates a dense, realistic foundation for your decorations.
Uneven Light Distribution
Wrapping lights only on the outside of the branches leaves the interior of the tree dark and flat. This makes your tree look less inviting and vibrant.
Weave your lights deep into the tree, close to the trunk, and then out to the tips. This layering technique ensures a rich, multi-dimensional glow that illuminates every ornament.
Overcrowding Ornaments
A common mistake is hanging too many ornaments too close together, especially all on the outer tips. This can make the tree look cluttered and heavy, hiding the beauty of individual pieces.
Distribute ornaments of varying sizes and textures throughout the tree, both deep within the branches and on the tips. Step back regularly to check for balance and visual flow.
Ignoring the Tree Skirt
Leaving the tree stand exposed detracts from the overall polished look of your decorated tree. It can make the setup appear unfinished or temporary.
A tree skirt or collar acts as a beautiful frame for your tree and provides a lovely base for gifts. Choose one that harmonizes with your tree’s theme and your room’s decor.
Troubleshooting
Lights Not Working After Decorating
This is a common and frustrating issue. First, check if the plug is fully inserted into the outlet and if the outlet itself is working.
If individual sections are out, use a light tester to find the specific bulb that is causing the outage. Often, replacing one faulty bulb or fuse can bring the entire strand back to life.
Tree Leaning or Unstable
A wobbly tree is a safety hazard. For real trees, ensure the stand screws are tightened firmly into the trunk, and the trunk is straight within the stand.
If your tree still feels unstable, consider placing wedges or shims under the stand to level it. You can also anchor taller trees to a nearby wall using clear fishing line for extra security.
Ornaments Keep Falling Off
Fragile ornaments falling is disheartening. Often, hooks are too loose or not fully closed around the branch.
Use sturdy metal hooks that can be gently squeezed shut around the branch. For heavier ornaments, consider using floral wire to secure them more firmly to the branch.
Key Takeaways
- Planning your tree’s placement and theme creates a cohesive, cozy aesthetic.
- Layering lights from the inside out ensures a deep, radiant glow.
- Draping garlands and ribbons loosely adds texture and elegance.
- Thoughtfully distributing ornaments of varying sizes creates visual balance.
- A well-chosen tree topper completes your tree’s festive silhouette.
- Don’t forget the tree skirt and surrounding decor to enhance the cozy atmosphere.
Frequently Asked Questions
Should I use real or artificial trees?
Both have their charm. Real trees offer that wonderful pine scent and a traditional feel, while artificial trees are reusable, often pre-lit, and can be easier to set up and maintain year after year. Choose what best fits your lifestyle and preferences.
How do I choose a theme for my tree?
Consider your home’s existing decor, your favorite colors, or a cherished memory. Themes can be simple, like “Winter Wonderland” with silvers and blues, or more personal, like “Family Memories” with handmade and sentimental ornaments. Let your creativity guide you.
When is the best time to decorate a Christmas tree?
Many families choose the first weekend of December, or even Thanksgiving weekend, to kick off the holiday season. Decorating too early might make the tree feel less special by Christmas Day, but ultimately, the best time is whenever it brings you the most joy.
How do I store my ornaments safely?
Invest in dedicated ornament storage boxes with individual compartments. Wrap delicate ornaments in tissue paper or bubble wrap. Store them in a cool, dry place to protect them from dust and damage until next year.
Our Top Recommended Finds
- Ornament Storage Box: Keeps your precious baubles safe and organized year after year, preventing breakage.
- Light Tester and Repair Kit: A lifesaver for quickly identifying and fixing faulty bulbs or fuses on light strands.
- Sturdy Step Stool: Essential for safely reaching the top of your tree and placing your topper without stretching.
Craft Your Cozy Holiday Masterpiece
Decorating your Christmas tree is more than just hanging ornaments; it’s about crafting a centerpiece that radiates warmth and joy throughout your home.
Each step in this guide is designed to help you create a beautiful, inviting tree that reflects your unique style and brings a smile to everyone who sees it.
Gather your loved ones, put on some festive music, and start creating those cherished holiday memories today. Your perfect, cozy Christmas tree awaits!