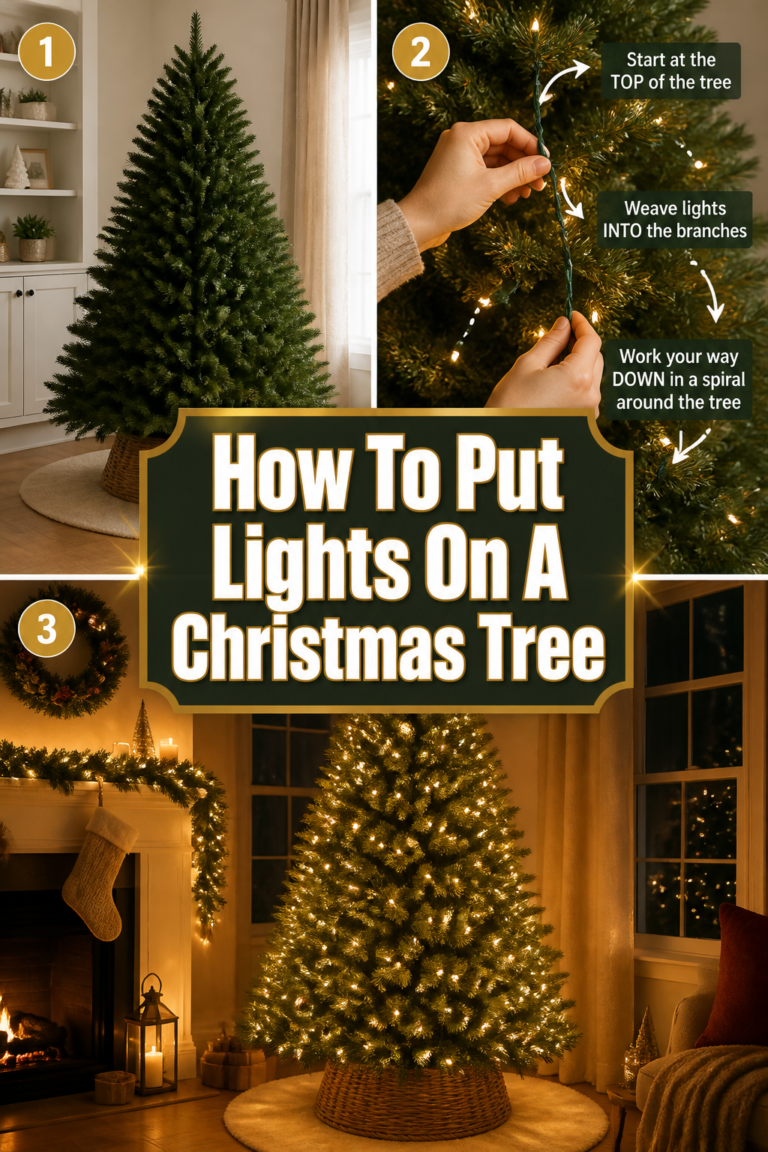
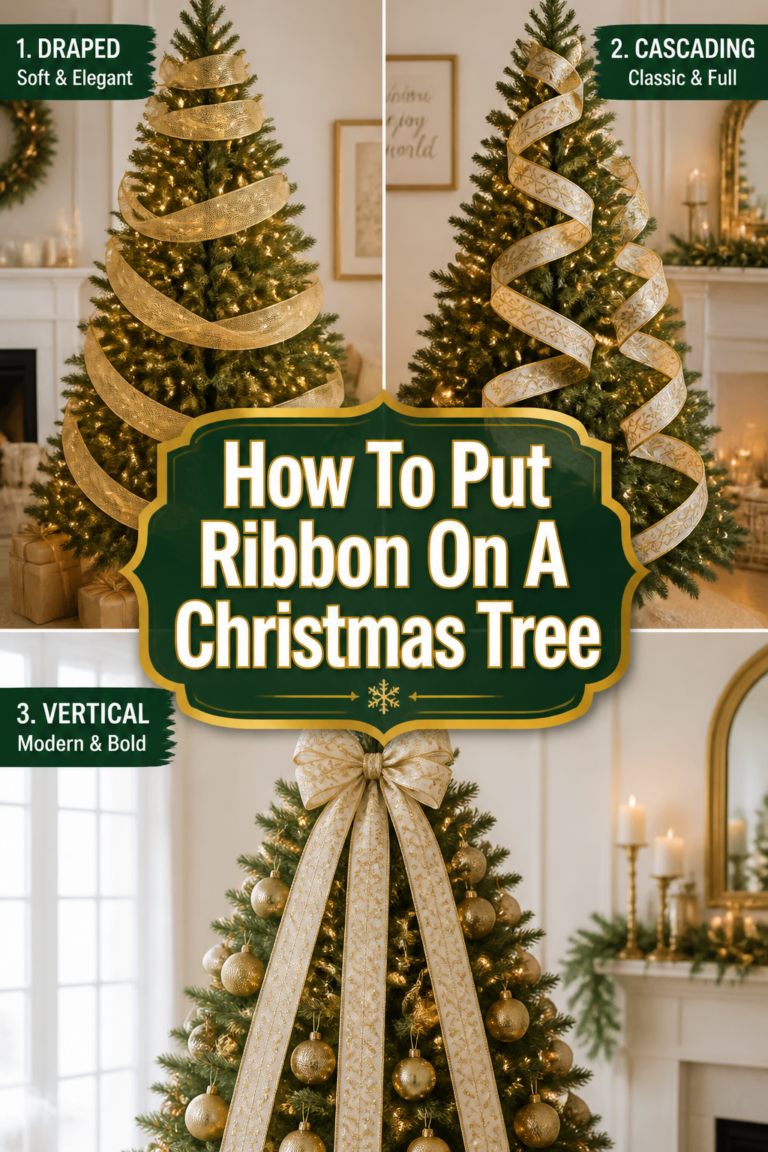
🎄 How To Add Ribbon To Your Christmas Tree
There is something truly transformative about the moment you add the first strand of ribbon to a Christmas tree.
After years of decorating professional holiday displays and my own cozy living room, I have learned that ribbon is the bridge between a simple tree and a designer masterpiece.
This guide will show you exactly how to achieve that high-end look without the stress or frustration usually associated with tangling long spools of fabric.
Quick Overview
Adding ribbon is the secret to a professional-looking tree. It fills in gaps, adds texture, and creates a cohesive color story that ties your entire room together.
- Time needed: 60 to 90 minutes
- Difficulty: Intermediate
- What you’ll need: Wired ribbon (2-3 rolls), sharp fabric scissors, pipe cleaners or floral wire, and a sturdy ladder.
Step-by-Step Instructions
Step 1: Choose the Right Ribbon
The success of your tree starts with the material you choose. Not all ribbons are created equal when it comes to holiday decorating.
Look for wired ribbon specifically. The wire allows you to shape “poufs” and “waves” that hold their form throughout the entire season.
Consider the scale of your tree. For a standard 7-foot tree, a 2.5-inch wide ribbon is usually the perfect balance for visibility and ease of use.
- Select a color that complements your existing room decor. If your living room has soft blues and creams, a champagne or silver ribbon will feel much more integrated than a bright primary red.
- Mix textures to add depth. Combining a heavy velvet ribbon with a sheer organza or a metallic mesh creates a sophisticated, multi-dimensional look.
- Check the underside of the ribbon. Some ribbons are single-sided, which means you have to be more careful when twisting them so the “ugly” side doesn’t show.
Pro Tip: Buy one more roll than you think you need. There is nothing more frustrating than being three-quarters of the way finished and realizing you have run out of your favorite pattern.
Step 2: Prepare Your Tree
Before the ribbon touches the branches, your tree needs to be “ribbon-ready.” This means the foundation must be solid.
Fluff every single branch. Reach deep into the center of the tree and pull the inner needles outward to create a dense, lush backdrop for your fabric.
Ensure your lights are already on and working. It is nearly impossible to string lights around ribbon without crushing the delicate shapes you are about to create.
- Turn the lights on while you work. This helps you see where the “dark holes” are in the tree, which are the perfect places to tuck your ribbon.
- Step back frequently. View the tree from the doorway of the room to see the overall silhouette and identify any flat spots.
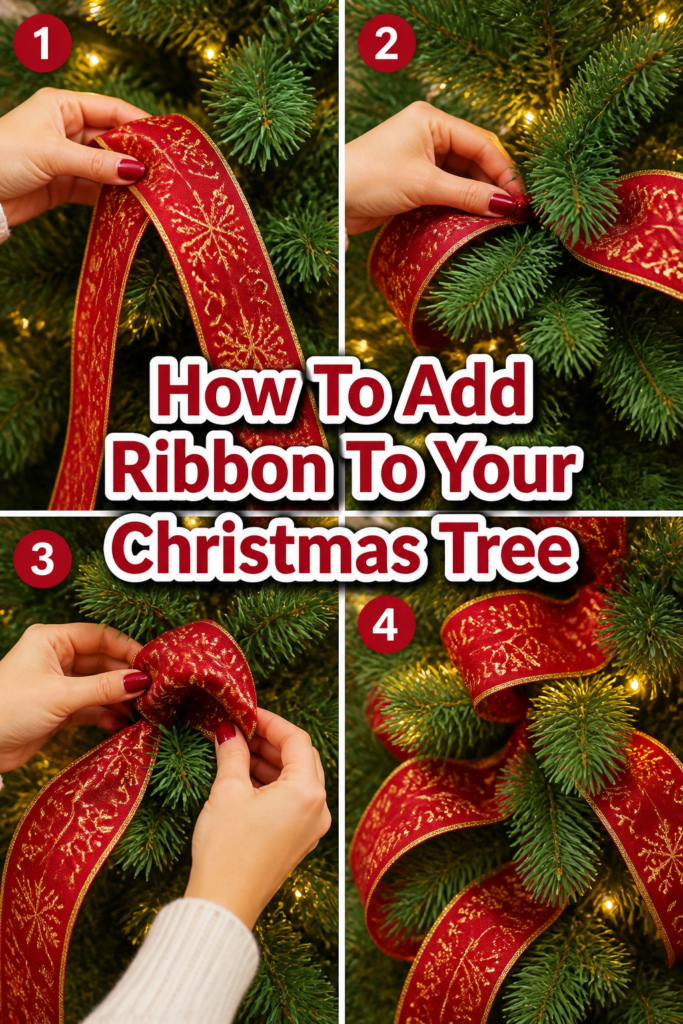
Step 3: Cut Your Ribbon into Sections
One of the biggest mistakes beginners make is trying to work directly from the spool. This leads to tangles and a “mummified” look where the ribbon is wrapped too tightly.
Instead, cut your ribbon into manageable strips. Lengths of three to four feet are usually the easiest to handle.
Working with shorter sections allows you to “weave” the ribbon in and out of the tree more naturally, making it look like the fabric is floating among the branches.
- Measure your first piece and use it as a template for the others. This ensures your “poufs” will be consistent in size.
- Angle your cuts at the ends. A “dovetail” or “fishtail” cut—where you fold the ribbon in half and cut upward toward the wired edge—adds a professional finishing touch.
Step 4: Anchor the Ribbon at the Top
Start your ribbon application near the top of the tree, just below the topper. This creates a logical flow for the eye to follow downward.
Take the end of your first three-foot strip and pinch it together. Use a branch near the trunk to wrap around the pinched end, securing it firmly in place.
You don’t need extra wire if your tree is artificial; the sturdy wire branches are perfect for gripping the fabric.
- Hide the starting point deep within the branches. You want the ribbon to look like it is emerging from the heart of the tree.
- Secure the anchor point tightly so the weight of the ribbon doesn’t cause it to sag over time.
Step 5: Create the Billow and Tuck
This is the most popular technique for a “designer” tree. It involves creating soft loops of fabric that dip in and out of the branches.
Take the ribbon about 10 inches down from your anchor point and create a “pouf.” Push the ribbon back into the tree and secure it again with another branch.
The goal is to create a soft “C” shape with the fabric. Do not pull it tight; let it have some volume and airiness.
- Vary the depth of your tucks. Some loops should sit right on the tips of the branches, while others should be tucked deeper inside.
- Change the direction of your billows. Instead of a straight vertical line, move diagonally to create a more organic, flowing appearance.
Pro Tip: If you are using two different ribbons, layer them on top of each other before you tuck. This “double-ribbon” look adds incredible luxury and makes a statement.
Step 6: Use the Diamond Pattern
To ensure the tree looks balanced from every angle, imagine a diamond grid over the surface of the tree. Place your ribbon poufs at the points where the lines of the diamond intersect.
This prevents the ribbon from looking like a series of vertical stripes, which can make the tree look shorter and wider than it actually is.
The diamond pattern helps distribute the color and texture evenly, guiding the viewer’s eye in a rhythmic path around the entire display.
- Work in sections around the tree. If your tree is in a corner, you can focus 80% of your ribbon on the visible front and sides.
- Maintain consistent spacing. If your first few poufs are 12 inches apart, try to keep that scale throughout the rest of the process.
Step 7: Finish with Elegant Tails
The ends of your ribbon should never just “stop.” They should look like they are gracefully trailing off into the ornaments.
When you reach the end of a strip, tuck the final tail slightly behind a branch or under a large ornament. Let the dovetail end peek out just enough to be visible.
For the very bottom of the tree, let the ribbon tails rest gently on the tree skirt or curl them into a spiral shape.
- Curl the wire edges with your fingers to give the tails a “bounce.” This adds a sense of movement to the tree.
- Check for any visible wire or unfinished edges. Every end should be either tucked away or neatly trimmed.
Common Mistakes to Avoid
The Maypole Wrap
This happens when you take a long, uncut spool of ribbon and wrap it tightly around the circumference of the tree. It often results in the tree looking “strangled” and hides the natural beauty of the branches. Instead of wrapping, always use the tuck-and-pouf method to create depth.
Using Flat or Non-Wired Ribbon
Grosgrain or satin ribbons without wire will inevitably limp and sag under their own weight. They won’t hold the beautiful shapes you see in magazines. Always opt for wired ribbon to ensure your tree stays looking fresh from late November through New Year’s Day.
Ignoring the Back of the Tree
Even if your tree is tucked into a corner, failing to add any ribbon to the sides can make the display feel lopsided. You don’t need to be as detailed in the back, but extending the ribbon slightly around the curve ensures a full, professional appearance from all seating positions in the room.
Troubleshooting
The Ribbon Keeps Sliding Off
If your ribbon won’t stay put, you are likely trying to secure it to the very tips of the branches. The tips are the weakest part of the tree. Reach about four to five inches into the branch where the wire is thicker and use that sturdier section to pinch and hold your ribbon.
The Tree Looks Too Busy
If you step back and the tree feels overwhelming, you may have used too much ribbon or too many competing patterns. Try removing one of the ribbon styles or widening the distance between your “poufs.” Sometimes, less is more when you want your ornaments to shine.
Gaps and Holes are Still Visible
If you can see the “trunk” or empty spaces through your ribbon, your poufs might be too small. Gently pull the ribbon outward to increase the volume of the loop. You can also place a large, oversized ornament right next to a ribbon tuck to fill the void and add visual interest.
Key Takeaways
- Always use wired ribbon to maintain the shape and structure of your loops.
- Cut your ribbon into three-foot sections to make the decorating process more manageable.
- Anchor your ribbon deep within the branches to create a natural, “growing” effect.
- Use the “tuck and pouf” method rather than wrapping the ribbon around the tree.
- Incorporate a diamond pattern to ensure even distribution and visual balance.
- Finish your ends with dovetail cuts for a polished, high-end look.
Frequently Asked Questions
How many yards of ribbon do I need for a 7-foot tree?
A good rule of thumb is to use about 9 feet of ribbon for every foot of tree height. For a 7-foot tree, you should aim for approximately 63 feet, or about three standard 20-foot rolls. If you like a very full look or have a very wide tree, you may want to have four rolls on hand.
Should I put the ribbon on before or after the ornaments?
Ribbon should almost always go on after the lights but before the ornaments. This allows the ribbon to serve as the “background” for your baubles. Once the ribbon is set, you can nestle your ornaments into the “valleys” created by the ribbon tucks for a layered effect.
Can I mix different widths of ribbon?
Mixing widths is a fantastic way to add designer flair. Try using a wide 4-inch ribbon as your primary base and then layering a thinner 1-inch velvet ribbon directly down the center of it. This creates a custom look that you won’t find in pre-decorated displays.
Our Top Recommended Finds
- Wired Velvet Ribbon: This is the gold standard for cozy, traditional trees. It catches the light beautifully and provides a rich, matte texture that feels incredibly high-end.
- Fabric Shears: Using dull kitchen scissors will fray the edges of your ribbon. A sharp pair of dedicated fabric shears will give you those perfect, crisp dovetail ends.
- Green Floral Wire: While branches work well for anchoring, having a pack of green floral wire is helpful for creating large “statement bows” or securing ribbon to a real tree with softer needles.
Bringing Your Holiday Vision To Life
Now that you have the techniques down, it is time to look at your room and decide on a theme. Whether you want a rustic farmhouse vibe with burlap ribbon or a glamorous “Winter Wonderland” with silver mesh, the process remains the same.
Don’t be afraid to experiment with different “pouf” sizes until you find the rhythm that works for your specific tree. Every tree has its own personality, and the ribbon is simply there to highlight its best features.
Put on some holiday music, pour a warm drink, and enjoy the process of crafting a centerpiece for your home. Once the ribbon is in place, you’ll find that adding the ornaments becomes an even more joyful and creative experience.