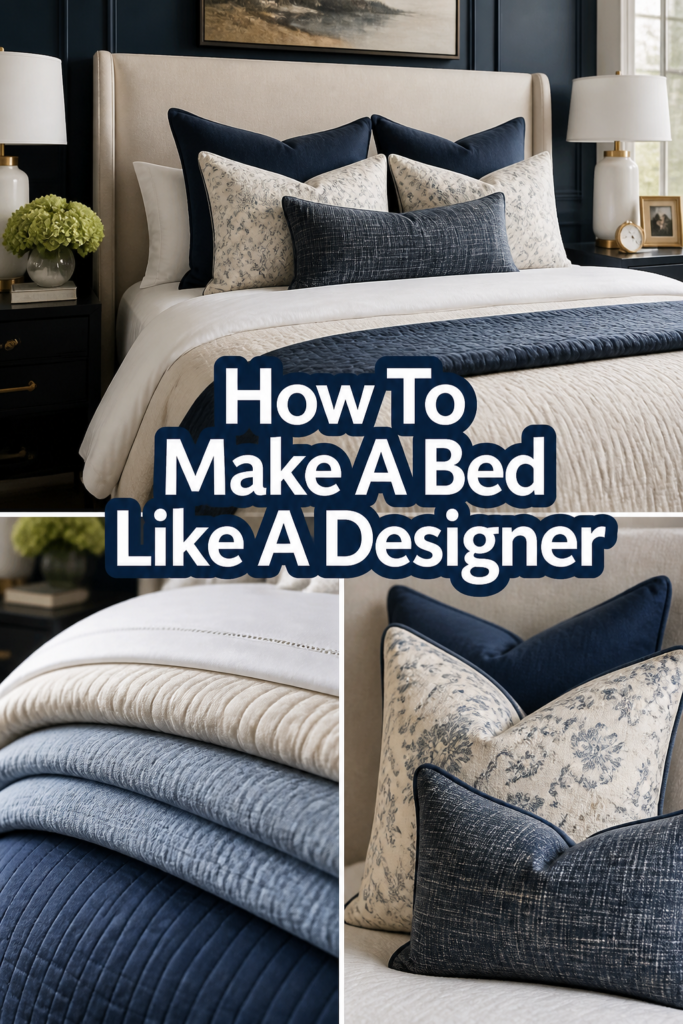
🛌 How To Make A Bed Like A Designer
I spent years working in high-end home staging where every bedroom had to look like a five-star retreat.
The secret isn’t just buying expensive linens, but rather how you layer them to create depth and comfort.
I have personally made thousands of beds, and this method is the one that consistently gets the most “wow” reactions from clients.
Quick Overview
Creating a designer bed is about more than just pulling up the covers.
It involves a strategic layering process that builds volume and texture from the mattress up.
- Time needed: 15-20 minutes
- Difficulty: Intermediate
- What you’ll need: Fitted sheet, flat sheet, coverlet or quilt, duvet with insert, two sleeping pillows, two decorative shams, two to three accent pillows, and a throw blanket.
Step-by-Step Instructions
Step 1: Prepare Your Foundation
Smooth your mattress protector and fitted sheet to ensure there are no lumps or wrinkles before you begin the decorative layers.
Tuck the fitted sheet tightly under the corners of the mattress to create a crisp, clean base that stays in place all night.
Check that the seams of the fitted sheet align perfectly with the edges of your mattress for a professional look.
Pro Tip: Use a handheld steamer on your fitted sheet once it is on the bed to remove any stubborn packaging creases.
Step 2: Layer The Flat Sheet Upside Down
Place your flat sheet on the bed with the finished side facing down toward the mattress.
Align the top edge of the sheet with the very top of your headboard or mattress edge.
Ensure that the sheet hangs evenly on both sides of the bed so the overhang is symmetrical.
Fold the top of the sheet back later, and the “pretty” side will be visible to anyone walking into the room.
Step 3: Master The Hospital Corner
Tuck the end of the flat sheet tightly under the foot of the mattress while leaving the sides hanging loose.
Lift the side of the sheet about a foot from the corner and fold it into a neat 45-degree angle on top of the mattress.
Tuck the bottom hanging portion under the mattress while holding that fold in place.
Drop the folded part down and tuck it in to create a sharp, military-style corner that looks incredibly tailored.
Pro Tip: Hospital corners prevent the sheets from shifting and give the bed a structured, high-end hotel silhouette.
Step 4: Add A Middle Layer For Texture
Lay a thin coverlet or a lightweight quilt over the flat sheet to add a secondary color or pattern.
Pull this layer up so it sits about six inches below the top edge of your flat sheet.
Fold the top of the flat sheet down over the coverlet to create a beautiful, contrasting cuff at the top of the bed.
Smooth out any air bubbles or wrinkles to keep the profile of the bed slim and intentional.
Step 5: Prepare The Duvet For Maximum Loft
Shake your duvet insert vigorously before putting it inside the cover to distribute the down or down-alternative fill evenly.
Stuff the duvet into the cover, ensuring the corners of the insert are tied or pinned into the corners of the cover.
Lay the duvet over the bed, pulling it all the way to the headboard initially to ensure it is centered.
Fold the top third of the duvet back toward the foot of the bed to reveal the layers of sheets and coverlet underneath.
Pro Tip: Use a duvet insert that is one size larger than your duvet cover to create a “cloud-like” overstuffed appearance.
Step 6: Arrange Your Sleeping Pillows
Fluff your standard sleeping pillows by hitting them on the sides to move the air back into the center.
Place them flat against the headboard if you prefer a modern, stacked look.
Prop them up vertically against the headboard if you want a more traditional, voluminous aesthetic.
Hide these pillows behind your decorative shams if they are not part of your color scheme or look slightly worn.
Step 7: Stack The Decorative Shams
Insert high-quality pillow forms into your large European shams or standard decorative shams.
Lean the European shams against the headboard or the back of your sleeping pillows to provide height and a backdrop for the rest of the arrangement.
Apply a gentle “karate chop” to the top center of the pillow to give it a lived-in, designer shape.
Ensure the shams are standing upright and not leaning forward, as this can make the bed look messy.
Step 8: Layer Your Accent Pillows
Select two or three smaller accent pillows that introduce a new texture, such as velvet, linen, or a subtle print.
Place the larger accent pillows in front of the shams and the smallest “lumbar” pillow in the very front center.
Vary the shapes by using a mix of squares and rectangles to keep the eye moving across the bed.
Limit yourself to no more than five decorative pillows total to avoid making the bed feel cluttered or difficult to unmake.
Pro Tip: Stick to an odd number of accent pillows for a more balanced and visually appealing composition.
Step 9: Drape The Finishing Throw
Fold a heavy knit or faux-fur throw blanket into a long, thin rectangle.
Lay it across the bottom third of the bed, allowing it to hang off the sides for a formal look.
Toss it casually over one corner of the foot of the bed if you prefer a relaxed, “effortlessly chic” vibe.
Adjust the folds so they look soft and inviting, rather than stiff or overly managed.
Common Mistakes to Avoid
The Flat Pillow Problem
Using thin, pancake-like pillows is the quickest way to make a bed look cheap and uninviting.
Designers always use overstuffed inserts because they provide the structural support needed for a beautiful display.
If your pillows are old, consider layering two thin ones inside a single sham to double the volume instantly.
Ignoring The Scale Of The Room
Small pillows on a King-sized bed can look lost and out of proportion with the rest of the furniture.
Always use European shams (26×26 inches) on larger beds to bridge the gap between the mattress and the headboard.
Conversely, avoid using too many large pillows on a Twin bed, which can overwhelm the space and make it look cramped.
Neglecting The Underside Of The Duvet
Many people forget that the underside of the duvet is visible when you fold it back for styling.
If your duvet cover has a plain white underside but a patterned top, the contrast might be jarring if not planned.
Choose covers that are double-sided or ensure your middle coverlet layer coordinates with the interior of the duvet.
Troubleshooting
The Duvet Keeps Sliding Down
If your duvet insert is constantly bunching at the bottom of the cover, it likely lacks proper interior ties.
You can sew small ribbons into the inside corners of your cover and tie them to the loops on your insert.
If your insert doesn’t have loops, use large safety pins on the inside corners to keep everything anchored together.
Wrinkled Linens After Washing
Natural fibers like linen and 100% cotton are prone to heavy wrinkling that can ruin a designer look.
Remove your sheets from the dryer while they are still slightly damp and place them immediately onto the bed.
The tension of the mattress will pull the fabric smooth as it finishes drying, saving you from having to iron.
The Bed Looks Too Rigid And Stiff
A bed that is perfectly tucked and smoothed can sometimes feel cold or like a museum display.
Break up the straight lines by slightly rumpling your throw blanket or choosing pillows with different textures.
Mixing a crisp cotton sheet with a chunky wool knit throw creates a sensory contrast that feels much more high-end.
Key Takeaways
- Start with a flat sheet placed upside down to ensure the decorative border is visible when folded back.
- Use hospital corners to create a tight, professional foundation that mimics luxury hotel styling.
- Layer multiple textures like quilts, duvets, and throws to give the bed visual depth and physical warmth.
- Invest in high-quality inserts that are slightly larger than their covers to achieve a plush, expensive look.
- Follow the rule of three for accent pillows to maintain balance without cluttering the sleeping area.
- Steam your linens once they are on the bed to remove any remaining creases for a flawless finish.
Frequently Asked Questions
What is the difference between a duvet and a comforter?
A duvet is a fabric bag filled with down or feathers that requires a separate cover, making it easy to wash and change styles.
A comforter is a single quilted piece that is already finished and does not require a cover, though it is often less “fluffy” than a duvet.
Designers almost always prefer duvets because they offer more volume and flexibility for seasonal styling updates.
How many pillows are too many?
The “too many” threshold is usually reached when you can no longer see the headboard or when it takes more than two minutes to unmake the bed.
A standard designer setup includes two sleeping pillows, two decorative shams, and two to three accent pillows.
If you have to move a mountain of cushions just to sit down, you should probably scale back the arrangement.
Should I use a flat sheet or just a duvet?
While many modern styles skip the flat sheet, using one allows you to create that beautiful folded-over cuff at the top of the bed.
Flat sheets also protect the duvet cover from body oils, meaning you don’t have to wash the bulky cover as frequently.
From a purely aesthetic standpoint, the extra layer of a flat sheet adds a level of sophistication that a duvet alone cannot match.
Our Top Recommended Finds
- Down-Alternative Euro Pillow Inserts: These provide the height and “karate chop” capability needed for a designer backdrop.
- Handheld Garment Steamer: This tool is essential for removing wrinkles from sheets and duvets without taking them off the bed.
- Over-Sized Cotton Quilt: A lightweight quilt in a neutral tone acts as the perfect middle layer for any color palette.
Bringing Your Dream Bedroom To Life
A well-made bed is the centerpiece of your sanctuary and the first step toward a more organized life.
You don’t need a professional decorator to achieve this look when you have the right layers and a few simple techniques.
Try experimenting with different textures today, perhaps by adding a chunky knit throw or a new set of velvet shams.
Once you master the art of the hospital corner and the duvet fold, you will never go back to a basic bed again.
Take ten extra minutes tomorrow morning to style your layers, and notice how much more peaceful your room feels.