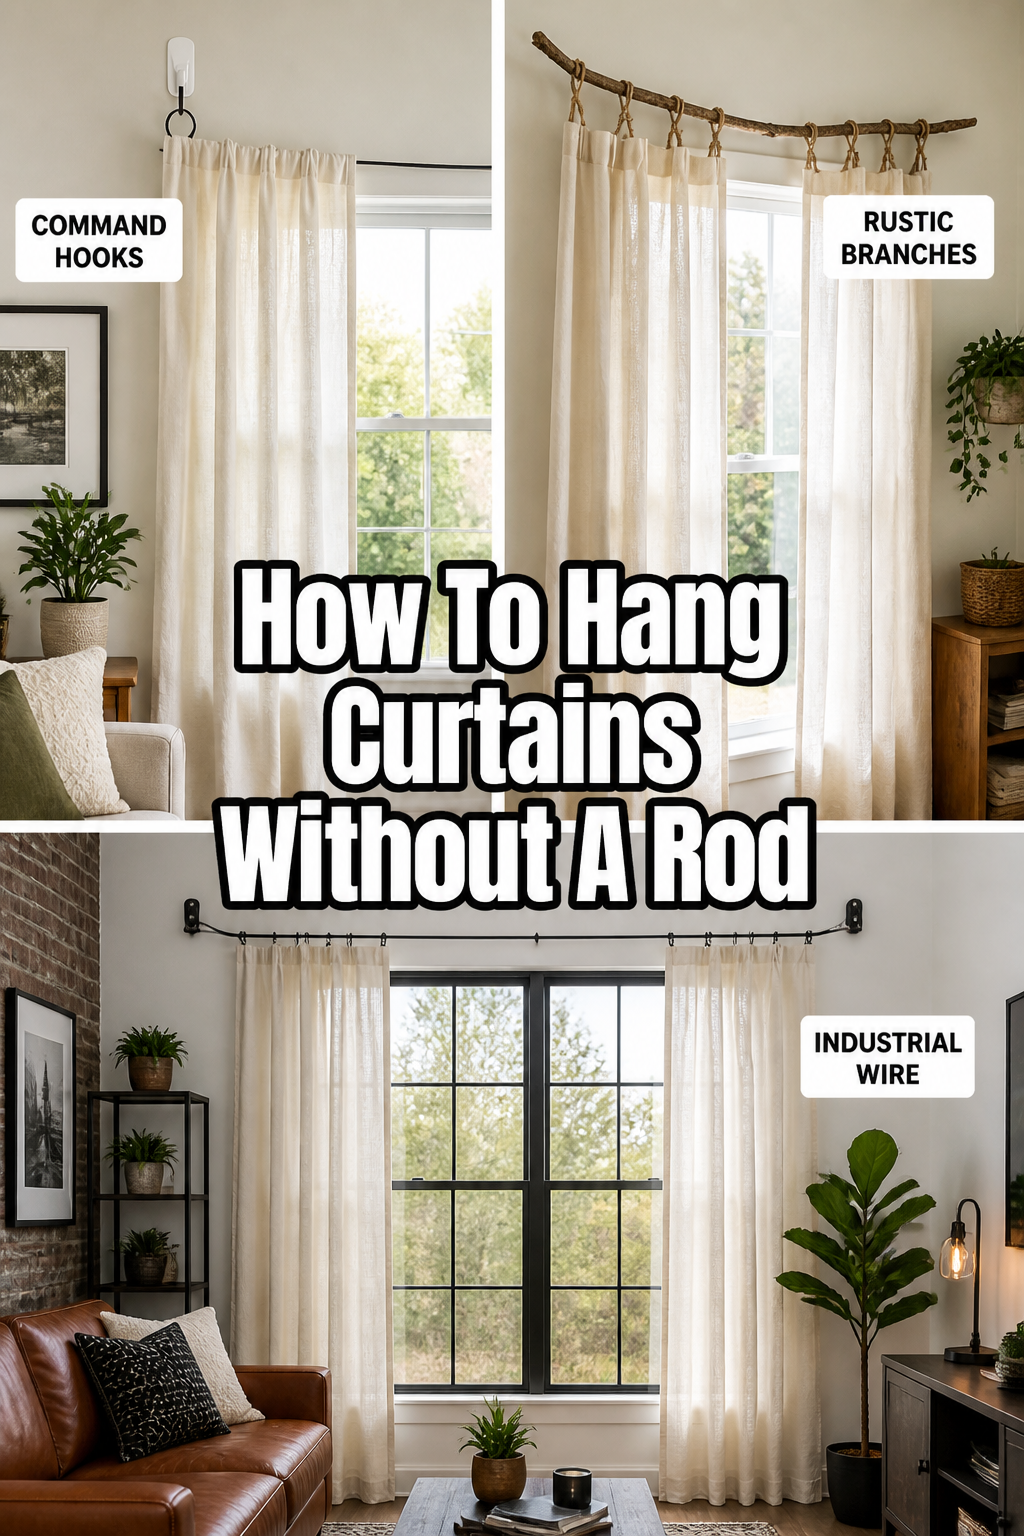
🏡 How To Hang Curtains Without A Rod
Oh, the joy of a beautifully dressed window! It’s amazing how a simple curtain can transform a room, adding instant warmth, privacy, and a touch of your unique style.
But what if you’re renting, or you simply don’t want the hassle of drilling holes and installing a traditional curtain rod?
I’ve been there, staring at bare windows, dreaming of cozy drapes without the commitment of power tools. This guide shares my favorite, tried-and-true methods for achieving that perfect window treatment, completely rod-free.

Quick Overview
Get ready to infuse your home with charm and comfort, all while keeping your walls intact!
- Time needed: 1-3 hours (depending on your chosen method and window count)
- Difficulty: Beginner
- What you’ll need: Measuring tape, scissors, your chosen curtains, and a selection of adhesive hooks, tension rods, or fabric fasteners.
Step-by-Step Instructions
Step 1: Envision Your Cozy Space
Before you even think about hooks, take a moment to imagine your ideal window. What kind of atmosphere do you want to create?
Consider the room’s purpose. A bedroom might call for blackout curtains and soft, flowing fabrics, while a kitchen could benefit from light, airy sheers.
Think about the overall aesthetic. Are you going for a bohemian vibe, a minimalist look, or a classic, elegant feel? Your curtain choice and hanging method will greatly influence this.
Pro Tip: Browse online for inspiration! Pinterest and Instagram are treasure troves of beautiful window treatments that don’t use traditional rods. Save images that speak to your style.
Step 2: Choose Your Rod-Free Method
This is where the magic happens! There are several clever ways to hang curtains without a rod. Each offers a different look and level of ease.
Tension Rods: These are fantastic for inside-mount curtains. They fit snugly within the window frame, creating a clean, understated look. They come in various lengths and strengths.
Adhesive Hooks & Clip Rings: Command hooks or other strong adhesive hooks can be placed above or beside your window frame. Clip rings then attach your curtains to these hooks, offering a classic draped appearance.
Adhesive Hooks & Wire/Twine: For a more rustic or bohemian feel, string a decorative wire or sturdy twine between two adhesive hooks. Your curtains can then be looped over, tied, or clipped onto this line.
Velcro Strips: This method is incredibly discreet and perfect for lightweight curtains or valances. One side of the Velcro adheres to your window frame, the other to your curtain fabric.
Fabric Tabs/Loops on Hooks: Many curtains come with fabric loops or tabs. These can be directly hung onto adhesive hooks, creating a simple and elegant drape.
Step 3: Gather Your Tools and Curtains
Once you’ve decided on your preferred method, it’s time to collect everything you need. Having all your supplies ready makes the process smooth and enjoyable.
You’ll definitely need a measuring tape, a pencil for marking, and good quality scissors. A step stool or small ladder will also be helpful for reaching higher windows.
Most importantly, grab your beautiful curtains! Ensure they are clean, wrinkle-free, and ready to hang. If they need ironing, do it now.
Finally, gather the specific hanging hardware for your chosen method: tension rods, various adhesive hooks, clip rings, Velcro strips, or decorative twine.
Step 4: Measure Twice, Hang Once
Accurate measurements are the secret to perfectly hung curtains. Don’t skip this crucial step!
First, measure the width of your window. If using a tension rod, measure the inside width of your window frame from side to side.
For adhesive hooks, decide if you want them inside the frame or outside. If outside, measure the width you want your curtains to cover, typically extending 4-6 inches beyond each side of the window for a fuller look.
Next, measure the length. Decide how long you want your curtains to be. Do you prefer them to just skim the windowsill, kiss the floor, or puddle elegantly on the floor?
Mark where you want the top of your curtain to hang. This is where your hooks or tension rod will be placed. Use a pencil for light, erasable marks.
Step 5: Prepare Your Curtains
A little preparation goes a long way in achieving a polished look. This step ensures your curtains are ready for their grand debut.
If your curtains are new, give them a quick iron or steam to remove any creases from packaging. This instantly elevates their appearance.
For methods using clip rings, attach the rings evenly along the top edge of your curtain. Space them out consistently for a beautiful, uniform drape.
If you’re using Velcro, affix one side of the Velcro strip to the top edge of your curtain, ensuring it’s straight and securely attached. Follow the product instructions for best adhesion.
Step 6: Install Your Chosen Hanging System
Now for the exciting part – getting those curtains up! Follow the instructions carefully for your chosen method.
For Tension Rods: Extend the rod until it’s slightly wider than your window frame. Insert one end into the frame, then gently compress the rod and push the other end into place. Release the tension, ensuring it’s snug and secure.
For Adhesive Hooks: Clean the surface where the hooks will go with rubbing alcohol and let it dry completely. Peel off the backing and firmly press the hook onto the marked spot for at least 30 seconds. Allow the adhesive to cure for the recommended time (usually an hour or more) before hanging anything.
For Adhesive Hooks & Wire/Twine: Once your hooks are securely cured, tie your decorative wire or twine to one hook. Thread it across to the other hook, pulling it taut, and tie it securely. You might need to adjust the tension.
For Velcro Strips: After preparing your curtains, clean the window frame surface thoroughly. Adhere the other side of the Velcro strip to the top of your window frame, pressing firmly. Then, simply align and press your curtain onto the frame, matching the Velcro strips.
Step 7: Drape and Style Your Curtains
With your curtains finally hanging, it’s time to add those finishing touches that make all the difference. This step is about personalizing your look.
Adjust the folds and gather of your curtains. Gently pull and arrange the fabric to create soft, even pleats for a refined appearance. Or, let them hang naturally for a more relaxed, bohemian feel.
If you used clip rings, ensure they are evenly spaced and the curtain hangs at your desired length. Make any minor adjustments to the position of your hooks or tension rod if needed.
Consider adding tie-backs or decorative holdbacks to pull the curtains open during the day. This lets in more light and adds another layer of visual interest to your window.
Step 8: Admire Your New View
Step back and take it all in! You’ve successfully transformed your window without a single drill hole. It’s a truly satisfying feeling.
Enjoy the added privacy, the softened light, and the instant injection of coziness your new curtains bring.
This simple change can make a huge impact on the overall feel of your room, proving that beautiful design doesn’t always require permanent alterations.
Take a moment to appreciate your handiwork and the fresh, inviting atmosphere you’ve created.
Common Mistakes to Avoid
Ignoring Curtain Weight
One of the biggest pitfalls is underestimating the weight of your curtains. Heavy, lined drapes require stronger adhesive hooks or a robust tension rod.
Using standard, lightweight adhesive hooks for thick curtains will likely lead to them falling down, causing frustration. Always check the weight capacity of your chosen hanging hardware.
Poor Surface Preparation for Adhesives
Adhesive hooks and Velcro strips rely on a clean, dry surface for optimal grip. Many people skip the cleaning step or don’t let the surface dry completely.
Grease, dust, or moisture will prevent the adhesive from bonding properly, leading to your curtains sagging or detaching. Always use rubbing alcohol and allow for air drying.
Incorrect Measurements
Rushing through measurements can result in curtains that are too short, too narrow, or hang unevenly. This can throw off the entire aesthetic of your room.
Always measure twice, and consider the ideal curtain length and width for your space before purchasing or starting the installation. A little extra fabric for fullness is usually better than too little.
Troubleshooting
Curtains Keep Falling Down
If your curtains consistently fall, it’s often due to insufficient adhesion or an overloaded hanging system. Reassess the weight of your curtains against the capacity of your hooks or rod.
For adhesive hooks, ensure the surface was thoroughly cleaned and dried before application. Allow the adhesive to cure for the full recommended time before hanging the curtains.
Consider upgrading to heavy-duty adhesive hooks or using more hooks spaced closer together to distribute the weight. For tension rods, make sure it’s extended tightly within the frame.
Gaps at the Sides of the Window
Gaps can let in unwanted light or compromise privacy. This usually happens when the hanging system doesn’t extend far enough beyond the window frame.
If using adhesive hooks outside the frame, ensure they are placed 4-6 inches wider than the window on each side. This allows the curtain to cover the entire opening.
For tension rods, ensure your curtains are wide enough to gather fully and still cover the entire glass area. You might need to add an extra curtain panel for more fullness.
Curtains Look Uneven or Sagging
Uneven curtains can detract from your room’s aesthetic. This often points to hooks being placed at different heights or an overloaded wire/twine system.
Use a level when marking your hook placement to ensure perfect alignment. If using wire or twine, ensure it’s pulled taut and consider adding a central support hook for longer spans.
Evenly spacing your clip rings or fabric tabs also helps create a consistent drape. Adjust the fabric gently until the desired look is achieved.
Key Takeaways
- Rod-free curtain hanging offers creative and damage-free solutions for any home.
- Careful planning, including envisioning your desired aesthetic, is the first crucial step.
- Accurate measurements are vital for a polished, professional-looking result.
- Always match your chosen hanging method to the weight and style of your curtains.
- Proper surface preparation is essential for the success of adhesive-based methods.
- Don’t be afraid to experiment with different techniques to find what works best for your space.
Frequently Asked Questions
Can I use these methods for blackout curtains?
Yes, absolutely! Blackout curtains tend to be heavier, so you’ll need to choose a robust hanging method. Heavy-duty adhesive hooks or a strong tension rod are excellent choices. Just ensure the weight capacity matches your curtain’s fabric.
Are these rod-free methods permanent?
Most rod-free methods are designed to be temporary or easily removable without damage. Tension rods leave no marks, and most quality adhesive hooks can be removed cleanly following the manufacturer’s instructions. Velcro can also be removed carefully.
Can I open and close curtains easily with these methods?
Yes, many methods allow for easy opening and closing. Curtains hung with clip rings on adhesive hooks or those on tension rods can glide smoothly. Velcro is best for stationary curtains or those you only adjust occasionally.
What if my window frame isn’t perfectly square for a tension rod?
If your window frame isn’t perfectly square, a tension rod might be tricky. In such cases, adhesive hooks placed outside the frame, or a wire/twine system, would be a more forgiving and adaptable solution to ensure your curtains hang beautifully.
Our Top Recommended Finds
- Heavy-Duty Adhesive Hooks: Look for hooks rated for a higher weight capacity than your curtains, ensuring they stay put.
- Adjustable Tension Rods: Choose a sturdy metal option with strong spring tension for reliable inside-mount hanging.
- Metal Clip Rings with Eyelets: These provide a smooth glide for opening and closing curtains, adding a touch of elegance.
Embrace Your Inner Decorator Today!
You now have all the tools and inspiration to transform your windows and elevate your home’s comfort. Hanging curtains without a rod isn’t just a practical solution; it’s an opportunity to express your creativity.
Imagine the soft light filtering through new drapes, the added privacy, and the undeniable charm they bring. This simple DIY project can truly refresh an entire room.
So, why wait? Grab your measuring tape, pick your favorite method, and start creating that cozy, inviting space you’ve been dreaming of. Your windows are waiting for their beautiful new look!