🖼️ How To Hang A Quilt On The Wall
There’s something truly magical about a quilt.
It’s more than just fabric and stitches; it’s a story, a hug, a piece of art that brings warmth and character to any space.
I remember the quiet joy of finally hanging my grandmother’s prize-winning quilt, transforming a blank wall into a cozy, personal gallery. This guide shares those same easy steps, born from years of helping others beautifully display their textile treasures.
Quick Overview
Transforming your quilt from a cozy blanket into a stunning wall art piece is a rewarding project. You’ll create a unique focal point in your home, preserving your cherished textile while adding a touch of personalized charm.
- Time needed: 1-3 hours (depending on chosen hanging method and quilt size)
- Difficulty: Beginner
- What you’ll need: Measuring tape, pencil, level, quilt hanging system (sleeve, clips, or rod), wall anchors/screws (if needed), drill, screwdriver, iron, sewing machine or needle/thread (if making a sleeve), thimble, fabric scissors.
Step-by-Step Instructions
Step 1: Envision Your Quilt’s New Home
Consider your quilt’s size, colors, and overall aesthetic. Think about how it will complement your room’s existing decor and color palette. This initial vision guides all your subsequent choices.
Look at the wall space you have available. A large quilt needs a generous, unobstructed wall, while smaller pieces can fill a cozy nook or act as an accent.
Think about the light in the room. Direct sunlight can fade delicate fabrics over time, so choose a spot that offers protection or consider UV-filtering window treatments.
Pro Tip: Place your quilt temporarily against different walls to see how it “feels” in the space. Stand back and observe from various angles. This helps solidify your vision before making any marks.
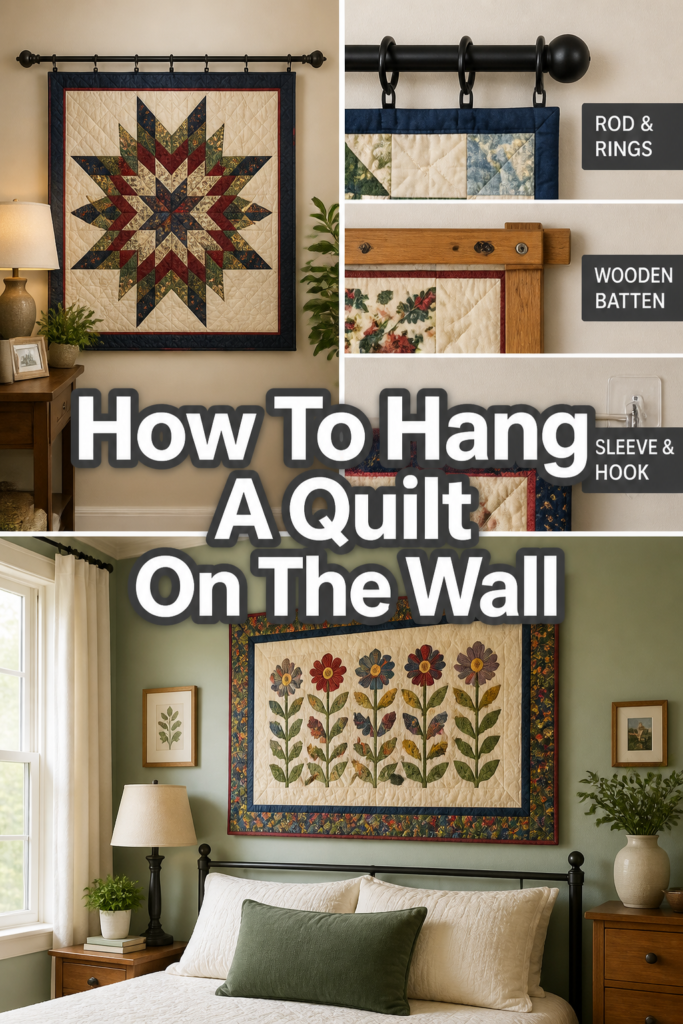
Step 2: Choose Your Quilt Hanging Method
The method you choose depends on your quilt’s weight, size, value, and your desired aesthetic. Each option offers unique benefits for displaying your textile art.
The Sleeve Method (Most Recommended): This involves sewing a fabric sleeve onto the back top edge of your quilt. A rod then slides through this sleeve, distributing the quilt’s weight evenly.
It provides excellent support, prevents stress on individual stitches, and gives a clean, professional look. This method is ideal for heirloom quilts or any piece you want to preserve long-term.
The Clip Method: Specialty clips designed for textiles can be attached to the top edge of your quilt. These clips often have a rubberized grip to prevent damage.
This method is quick, easy to change, and great for lighter quilts or those you might want to rotate frequently. Be mindful of the number of clips needed to avoid sagging.
The Velcro Method: A strip of soft Velcro is sewn onto the back of your quilt, and the hook side is glued or stapled to a wooden slat mounted on the wall. The quilt then attaches directly to the slat.
This method offers a very clean, invisible hang. It’s best for lighter to medium-weight quilts and ensures the quilt lies very flat against the wall.
Step 3: Prepare Your Quilt for Hanging (Sleeve Method Focus)
If you’ve chosen the sleeve method, this step is crucial for the quilt’s longevity and appearance. A well-made sleeve ensures even weight distribution and prevents sagging.
Select a sturdy, color-matched cotton fabric for your sleeve. It should be about 2 inches shorter than the width of your quilt and 4-5 inches tall.
Press the fabric to remove any wrinkles. Fold the long edges under by about 1/2 inch and press again, then stitch them down.
Fold the sleeve in half lengthwise, right sides together, and stitch the raw short ends to create a loop. Turn it right side out and press the seam flat.
Pin the finished sleeve to the back top edge of your quilt, about 1/2 inch down from the top. Ensure it’s centered and lies flat.
Hand-stitch the sleeve securely to the backing fabric of your quilt using a blind stitch or whipstitch. Avoid stitching through to the front of the quilt.
Pro Tip: For larger, heavier quilts, consider using a wider sleeve (6-8 inches) or adding a second, shorter sleeve further down the quilt for extra support, especially if the quilt is very long.
Step 4: Gather Your Tools and Hardware
Having all your supplies ready before you begin saves time and frustration. A little organization goes a long way in ensuring a smooth installation.
Confirm you have the correct hanging rod for your quilt’s width. It should be slightly shorter than your quilt’s sleeve to remain hidden.
Check that your wall brackets are sturdy enough to support the quilt’s weight. Decorative finials for the rod ends can add a nice touch.
Prepare your measuring tape, pencil, and a reliable level. A laser level can be incredibly helpful for ensuring perfect alignment.
Gather your drill, appropriate drill bits for your wall type, a screwdriver, and any necessary wall anchors or screws.
Step 5: Measure and Mark Your Wall
Accurate measurements are key to a professional-looking display. Take your time with this step to avoid crooked or off-center placement.
Determine the desired height for your quilt. A good rule of thumb is to hang the center of the quilt at eye level (around 57-60 inches from the floor), but adjust based on your room’s furniture and ceiling height.
Mark the center point of your chosen wall space with a light pencil mark. This will be the center of your quilt.
Measure the width of your quilt. Divide this by two to find the distance from the center mark to where the rod’s brackets will be placed.
Lightly mark the locations for your wall brackets, ensuring they are perfectly level with each other. Use your level to draw a faint horizontal line.
Pro Tip: If hanging above furniture, ensure there’s enough clearance so the quilt doesn’t touch. Leave at least 6-8 inches of space between the bottom of the quilt and the top of the furniture.
Step 6: Install the Hanging Hardware
This step involves drilling into your wall, so proceed carefully and ensure you’re using the correct hardware for your wall type.
Hold a bracket up to one of your pencil marks. Use your pencil to mark the screw holes.
Drill pilot holes for your screws. If drilling into drywall and not a stud, use appropriate wall anchors to ensure a secure hold.
Attach the first bracket firmly to the wall using your drill or screwdriver. Do not overtighten.
Repeat the process for the second bracket, double-checking with your level before tightening. Ensure the brackets are perfectly aligned horizontally.
Step 7: Hang Your Quilt
The moment of truth! With careful preparation, this step should be smooth and satisfying.
Slide your quilt rod through the sleeve on the back of your quilt. Ensure the quilt is centered on the rod.
Lift the rod with the quilt attached and carefully place the ends of the rod into the installed wall brackets.
Adjust the quilt as needed, smoothing out any wrinkles or folds. Ensure it hangs evenly and freely.
Add the decorative finials to the ends of the rod, if using, to complete the look.
Step 8: Step Back and Admire Your Work
Take a moment to appreciate the beautiful transformation. Your quilt is now a captivating piece of art, adding warmth and personality to your home.
Check for any final adjustments. Does it need to be straightened slightly? Are there any minor wrinkles that can be gently smoothed?
Observe how the quilt interacts with the light and other elements in the room. Enjoy the cozy ambiance it creates.
Common Mistakes to Avoid
Ignoring Quilt Weight and Size
Many people underestimate the actual weight of a quilt, especially larger, older ones. Hanging a heavy quilt with inadequate support can lead to sagging in the middle, putting undue stress on the fabric and stitches, or even causing the hanging system to pull out of the wall. Always choose a sturdy rod and brackets, and use appropriate wall anchors for the quilt’s weight and your wall material.
Uneven Placement
A crooked or off-center quilt can detract from its beauty and make a room feel unbalanced. Rushing the measuring and marking steps often leads to this mistake. Always use a level, measure multiple times, and step back frequently to visually assess the placement before drilling any holes. Taking a few extra minutes here saves a lot of frustration later.
Using Inappropriate Hardware
Using flimsy curtain rods, small nails, or standard pushpins is a common pitfall. These can damage your quilt by piercing fabric, causing tears, or not providing enough support, leading to permanent creases or sagging. Invest in a dedicated quilt hanging rod or system designed for textiles, and always use wall anchors when attaching hardware to drywall without a stud.
Direct Sunlight Exposure
Hanging a quilt in direct sunlight, even for a few hours a day, can cause irreversible fading and deterioration of the fabrics and dyes over time. This is especially true for vintage or antique quilts. Position your quilt on a wall that receives indirect light or consider adding UV-filtering window treatments to protect your textile art from harmful rays.
Troubleshooting
Quilt Sags in the Middle
If your quilt is bowing or sagging significantly in the center, it’s a sign that the weight isn’t being distributed effectively. The rod might be too thin or too long for the quilt’s weight, or you might not have enough support points.
Solution: Consider replacing your current rod with a thicker, more rigid one. If using a sleeve, add a third, central bracket for extra support. For very wide quilts, you might even consider two shorter rods side-by-side with a central support, or adding a second, shorter hanging sleeve lower down the quilt with its own support system to distribute the weight vertically.
Quilt Slips Off Clips or Rod
If your quilt keeps slipping off the clips, they might not have a strong enough grip, or there aren’t enough clips to hold the weight. If it’s slipping off the rod, the rod might be too smooth or the sleeve too loose.
Solution: For clips, try using more clips spaced closer together, or invest in clips specifically designed for heavier textiles with rubberized grips. If using a rod, ensure the sleeve isn’t overly wide, allowing the quilt to slide. You can add small, clear rubber stoppers inside the rod ends or on the finials to prevent the quilt from shifting. For very slick rods, a thin strip of non-slip shelf liner inside the sleeve can provide extra friction.
Wall Damage from Installation
Accidentally drilling too large a hole, or having anchors pull out, can leave unsightly damage on your wall. This often happens from not using the correct drill bit size or selecting the wrong anchor for your wall material.
Solution: For small holes, spackle and paint can easily repair the damage. If an anchor has pulled out, you’ll need to remove any loose debris, fill the larger hole with spackle or drywall compound, sand it smooth once dry, and then repaint. When re-hanging, use a larger, more robust anchor designed for heavier loads, or try to shift the bracket location slightly to drill into an untouched part of the wall or a stud if possible.
Key Takeaways
- Prioritize the preservation of your quilt by choosing a hanging method that distributes weight evenly and avoids stress points.
- Measure and mark your wall meticulously with a level to ensure your quilt hangs straight and centered, creating a polished look.
- Invest in appropriate, sturdy hardware designed for the weight of your quilt and the type of wall you have.
- Protect your quilt from direct sunlight to prevent fading and fabric deterioration over time.
- Don’t rush the process; thoughtful preparation leads to a beautiful and lasting display of your textile art.
Frequently Asked Questions
Can I hang a vintage or antique quilt?
Yes, you absolutely can! However, vintage and antique quilts require extra care due to their age and potential fragility. Always opt for the sleeve method to distribute weight evenly and minimize stress on delicate fabrics. Avoid clips or methods that put pressure on small areas. Consider professional conservation advice for very valuable or fragile pieces.
How do I clean a hung quilt?
Regular, gentle dusting with a soft brush or a vacuum cleaner with a brush attachment (and a clean nylon screen between the quilt and the vacuum) is usually sufficient. For deeper cleaning needs, especially for older or delicate quilts, consult a professional textile conservator. Avoid machine washing or harsh chemicals, which can damage fibers and dyes.
What if my wall isn’t perfectly flat?
Slightly uneven walls can make it challenging to hang a quilt perfectly flush. If you encounter this, you can sometimes use small shims behind the wall brackets to adjust their projection and ensure the rod sits level. For the sleeve method, a slightly more flexible rod might also conform better to minor wall irregularities.
Can I use command strips or adhesive hooks?
While tempting for their ease of use, command strips and adhesive hooks are generally not recommended for hanging quilts, especially for long periods or for heavier pieces. They can pull threads, leave residue, or even cause tears when removed. The adhesive may also degrade over time, leading to the quilt falling and potentially being damaged.
Our Top Recommended Finds
- Heavy-Duty Adjustable Quilt Rod with Brackets: Look for metal rods that can extend to fit various quilt widths and come with robust, decorative brackets for a secure and stylish display.
- Acid-Free Cotton Fabric for Sleeves: Using archival-quality cotton ensures your sleeve won’t degrade or harm your quilt over time. It’s a small detail that makes a big difference for preservation.
- Laser Level Tool: While a bubble level works, a laser level projects a perfectly straight line across your wall, making it incredibly easy to mark bracket positions accurately and ensure a perfectly level hang.
Your Quilt, Your Canvas: A Story on the Wall
Transforming your beloved quilt from a folded treasure into a vibrant piece of wall art is an incredibly satisfying journey. Each stitch, each pattern, now has its moment to shine, bringing comfort and beauty into your everyday life. Imagine the warmth and character your quilt will bring to your living space – why wait to share its story?
Perhaps this project will inspire you to explore other textile arts, or even to rotate your quilt displays seasonally, giving different pieces a chance to grace your walls. Step into your creative power today and let your cherished quilt become the masterpiece it was always meant to be.