🖼️ How To Hang A Picture With Two Hooks
There’s a special kind of magic that happens when you hang a beloved piece of art on your wall.
It transforms a house into a home, adding personality and warmth to your living space.
I’ve spent countless hours perfecting my own gallery walls and helping friends bring their visions to life, and I’ve learned that two hooks are often the secret to a perfectly level and secure display.

Quick Overview
This guide will walk you through the simple steps to securely hang a picture with two hooks, ensuring it looks fantastic and stays put for years.
You’ll learn how to measure, mark, and install your hardware with confidence, creating a beautifully balanced display.
- Time needed: 30-60 minutes
- Difficulty: Beginner
- What you’ll need: Picture frame, measuring tape, pencil, level, picture hanging hooks, hammer (or drill for anchors), wall anchors (optional)
Step-by-Step Instructions
Step 1: Choose Your Spot and Visualize
Before you even pick up a tool, decide where your picture will live. Consider the room’s flow and how the artwork will interact with furniture and other decor.
Hold the picture up to the wall at different heights and positions. Imagine it as a focal point, or as part of a larger arrangement.
Pro Tip: For a cozy, inviting feel, hang art at eye level for an average-height person. This usually means the center of the picture is about 57-60 inches from the floor.
Step 2: Prepare Your Picture Frame
Lay your picture frame face down on a clean, soft surface. This protects the glass and frame finish.
Locate the two D-rings or sawtooth hangers on the back of your frame. These are what your hooks will connect to.
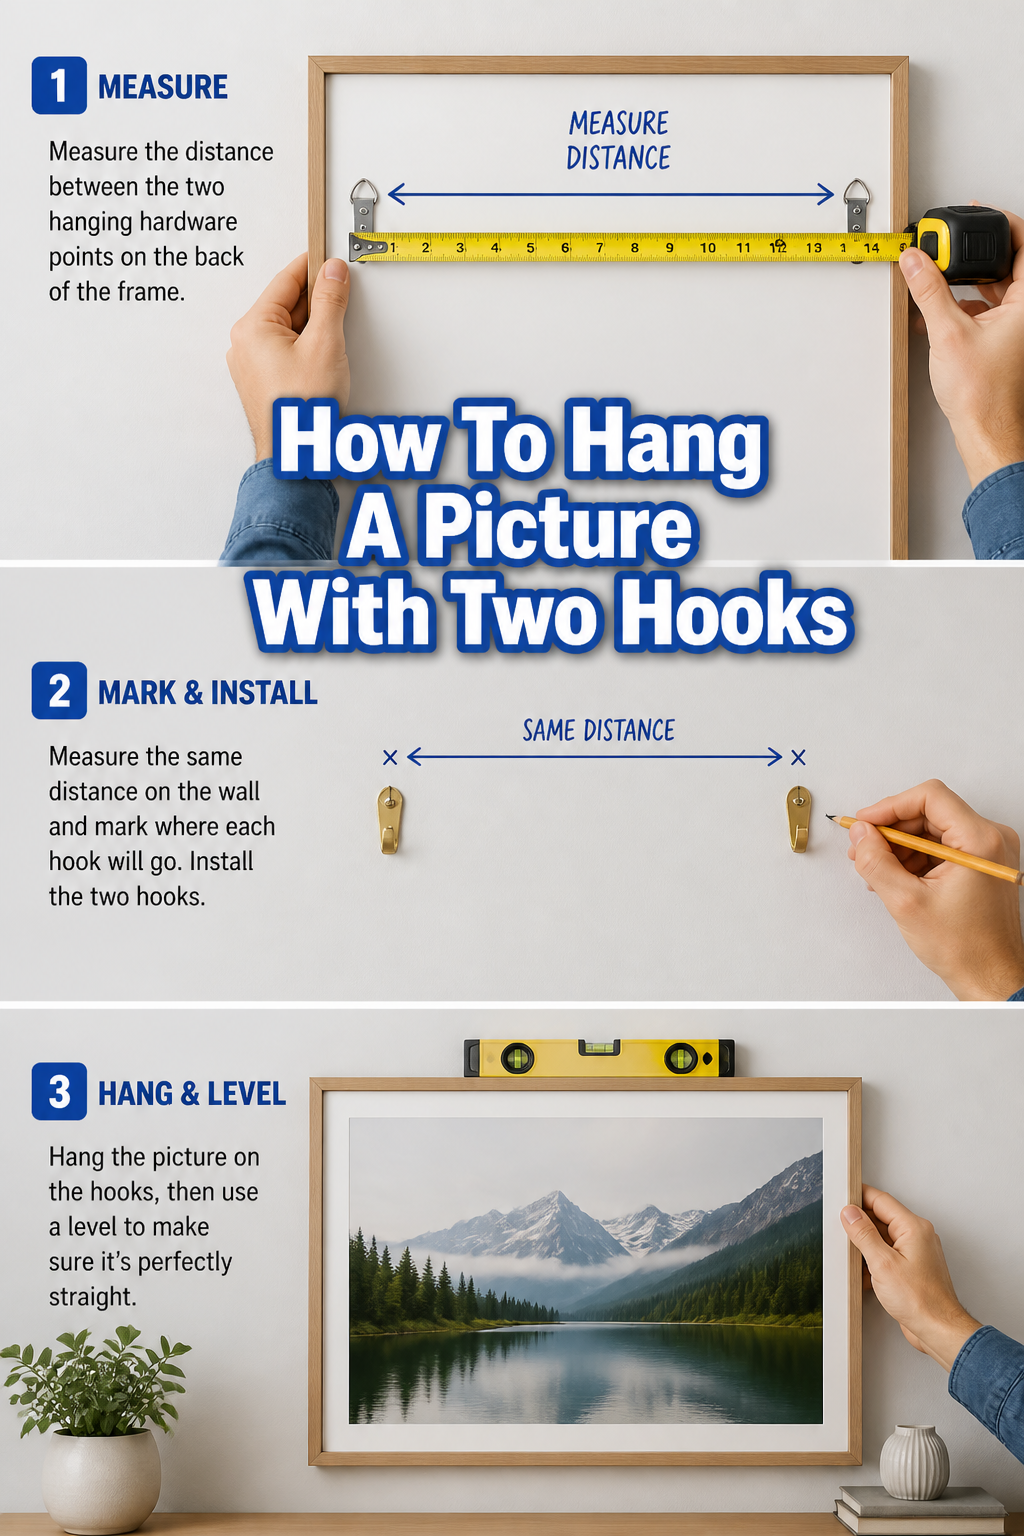
Step 3: Measure the Distance Between Hangers
Using your measuring tape, carefully measure the exact distance between the inside edges of your two D-rings or the centers of your sawtooth hangers.
Write this measurement down. Accuracy here is key to a perfectly level picture.
Pro Tip: If using D-rings, measure from the very top of the D-ring where the hook will rest. For sawtooth hangers, measure from the center of the “sawtooth” where the nail will sit.
Step 4: Determine Hook Placement on the Wall
Now, let’s figure out where the hooks will go on your wall.
First, measure the distance from the top of your picture frame down to the top edge of your D-rings or the center of your sawtooth hangers.
This tells you how far down from the top of the frame your hooks will sit.
Step 5: Mark Your First Hook Position
Go back to your wall and decide on the exact desired height for the top of your picture frame. Use your pencil to make a light mark.
From this top-of-frame mark, measure downwards the distance you found in Step 4. This is where your first hook will be.
Make a clear pencil mark for this first hook’s exact spot.
Step 6: Mark Your Second Hook Position with Precision
From your first hook mark, measure horizontally across the wall the distance you found in Step 3 (the distance between your picture’s hangers).
Make another pencil mark for your second hook.
Now, place your level on top of these two marks. Adjust the second mark slightly up or down until the level shows both marks are perfectly horizontal.
This ensures your picture will hang straight and true.
Pro Tip: Use a small piece of painter’s tape on the wall for your marks. This makes them easier to see and protects your wall when erasing.
Step 7: Install Your Picture Hooks
Carefully place the first picture hook over its corresponding pencil mark.
Using a hammer, gently tap the nail(s) into the wall. Ensure the hook is firmly seated and secure.
Repeat this process for the second hook, aligning it precisely with your second pencil mark.
If your picture is heavy or your wall material is soft, consider using wall anchors for extra security. Drill a pilot hole first, insert the anchor, then screw in the hook.
Step 8: Hang Your Picture and Adjust
Carefully lift your picture frame and align the D-rings or sawtooth hangers with your newly installed hooks.
Gently lower the picture onto the hooks, making sure both sides are securely engaged.
Step back and admire your work! Use your level one last time across the top of the frame to ensure it’s perfectly straight.
Make any minor adjustments needed by gently shifting the frame.
Step 9: Clean Up and Enjoy
Erase any visible pencil marks on the wall.
Take a moment to appreciate how your new artwork enhances the room, adding a touch of your unique style and warmth.
Common Mistakes to Avoid
Uneven Hook Placement
A common pitfall is rushing the measuring process, leading to hooks that aren’t perfectly level or correctly spaced.
If your hooks are even slightly off, your picture will hang crookedly, no matter how much you try to adjust it.
Always double-check your measurements and use a level to confirm your marks before hammering in any nails. Precision here saves a lot of frustration later.
Using the Wrong Hardware
Choosing a hook that isn’t strong enough for your picture’s weight can lead to your artwork crashing down.
Similarly, using a tiny nail for a heavy frame won’t provide adequate support.
Always check the weight rating on your picture hooks and ensure they match or exceed the weight of your frame. For heavier pieces, opt for hooks with multiple nails or consider using wall anchors.
Ignoring Wall Material
Not all walls are created equal. Drywall, plaster, and brick each require different approaches for secure hanging.
Hammering a nail directly into drywall without a stud for support might be fine for a very light picture, but anything substantial will eventually pull out.
If you’re not hitting a stud, use appropriate wall anchors designed for your wall type. These provide a much more secure hold than a simple nail.
Hanging Too High or Too Low
The perfect picture can lose its impact if hung at an awkward height.
Hanging art too high makes it feel disconnected from the room, while too low can make it look like an afterthought.
Remember the 57-60 inch rule for the center of the picture. Always visualize the piece in place before making any marks, considering how it relates to furniture below it.
Troubleshooting
Picture is Tilting or Crooked
If your picture is tilting, even after careful hanging, the most common culprit is uneven hook placement.
Take the picture down and re-check the level of your two installed hooks. One might be slightly higher or lower than the other.
You may need to remove one hook, patch the small hole, and re-install it, ensuring it aligns perfectly with the level.
Hooks Are Pulling Out of the Wall
This usually indicates that the hardware isn’t strong enough for the picture’s weight or the wall material isn’t providing adequate support.
If you didn’t use wall anchors and aren’t in a stud, remove the hooks and patch the holes.
Then, re-install with appropriate wall anchors (e.g., self-drilling drywall anchors or toggle bolts for heavier items) or try to locate a stud with a stud finder for a stronger hold.
Frame Sits Away from the Wall
Sometimes, the frame doesn’t sit flush against the wall, creating a gap at the top or bottom.
This can happen if the D-rings or sawtooth hangers are too far recessed into the frame, or if the hook itself is too bulky.
Try using a flatter style of picture hook, or consider adding small felt pads to the bottom corners of the frame to push it slightly away from the wall, creating a more even appearance.
Key Takeaways
- Accurate measurements are the foundation of a perfectly hung picture.
- Always use a level to ensure your hook marks are perfectly horizontal.
- Choose picture hooks appropriate for the weight of your frame and the type of wall.
- Wall anchors are your friends for heavy art or when not hitting a stud.
- Hang art at eye level (center of picture 57-60 inches from floor) for optimal viewing.
- Don’t be afraid to adjust and re-measure until it looks just right.
Frequently Asked Questions
Can I hang a heavy picture with just two hooks?
Absolutely! Two properly installed hooks, especially with appropriate wall anchors or into studs, can securely hold very heavy pictures. Always check the weight rating of your chosen hooks and ensure they exceed the picture’s weight.
How do I find a stud in my wall?
A stud finder is the easiest tool for this. Simply slide it across the wall, and it will indicate when it detects a stud. If you don’t have one, you can often tap along the wall and listen for a solid sound, or look for electrical outlets or light switches, as studs are usually found on either side of these.
What if my picture only has one hanger in the middle?
If your picture only has a single wire or hanger, you would typically use one hook. However, if it’s a very wide picture, it might still benefit from two hooks placed on the wire, spaced out for stability. For a single central hanger, measure from the top of the frame to the wire’s resting point, then mark that height on the wall.
Do I need to use wall anchors every time?
No, not every time. For lighter pictures (under 10-15 lbs) where you’re just using a small nail, you might be fine, especially if you happen to hit a stud. However, for heavier frames or if you’re uncertain about the wall’s integrity, using a wall anchor provides significant added security and peace of mind.
Our Top Recommended Finds
- Picture Hanging Kit: A good kit often includes a variety of hooks, nails, and even a small level, perfect for getting started with different frame sizes.
- Digital Stud Finder: Essential for locating studs and avoiding electrical wires, making your hanging projects safer and more secure.
- Laser Level: For those who love precision or are hanging multiple pieces in a gallery wall, a laser level projects a perfectly straight line across your wall.
Crafting Your Cozy Haven, One Picture at a Time
Hanging a picture might seem like a small task, but it’s one of the most impactful ways to personalize your home.
With these practical steps, you now have the confidence to transform your walls into a reflection of your unique style and memories.
Don’t let a blank space linger. Grab your tools, pick out that special piece, and start creating the cozy, inviting atmosphere you’ve always dreamed of.