🎵 How To Hang Vinyl Records On The Wall
There’s a special magic in vinyl records, isn’t there?
They’re not just for listening; their artwork tells stories and adds a unique vintage charm to any space.
I’ve personally transformed many a blank wall into a cozy, music-inspired haven using these beloved discs, and I’m excited to share all my best tips with you.
Quick Overview
Ready to turn your record collection into a stunning visual display? This guide will walk you through creating a beautiful, personalized gallery that speaks to your soul.
You’ll learn how to safely mount your favorite albums, ensuring they look fantastic and stay secure for years to come, all while enhancing your room’s cozy vibe.
- Time needed: 1-3 hours (depending on project size)
- Difficulty: Beginner
- What you’ll need: Records, wall mounts (frames, shelves, or adhesive options), measuring tape, pencil, level, cleaning cloth, optional power drill, small nails/screws.
Step-by-Step Instructions
Step 1: Gather Your Musical Treasures
First, pick out the vinyl records you want to display. Think about the album art that truly resonates with you and the mood you want to create.
Consider a mix of your all-time favorites, albums with striking covers, or even records that hold sentimental value.
Lay them out on the floor to get a preliminary sense of the arrangement and how their colors and designs play together.
Step 2: Choose Your Display Method
There are several lovely ways to hang your records, each offering a different aesthetic.
Your choice will depend on your style, budget, and whether you want to easily swap out your albums.
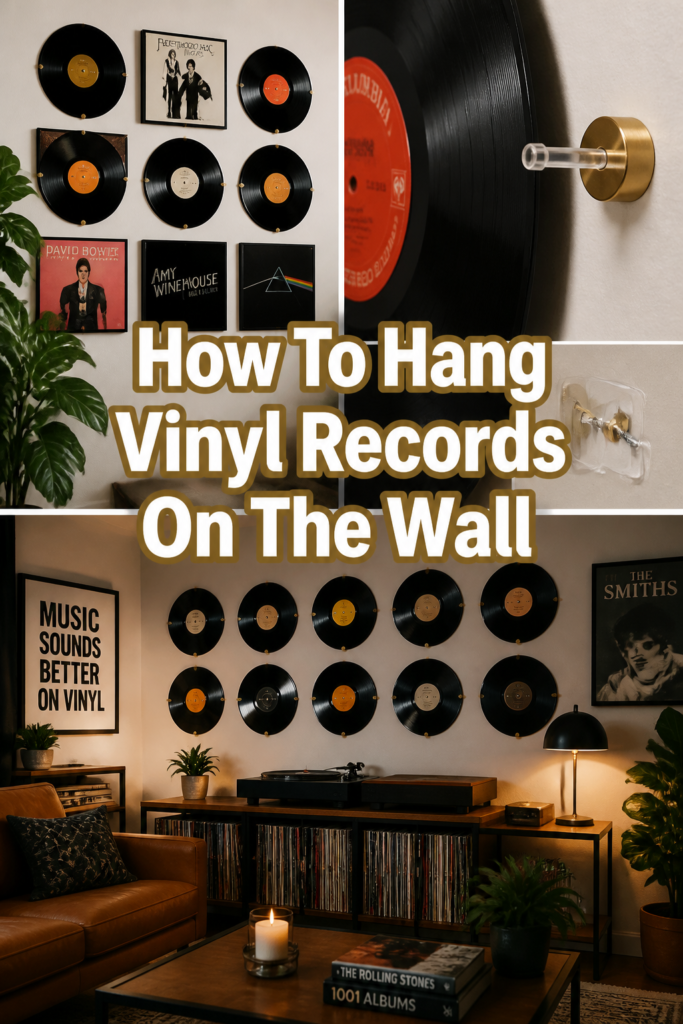
Option A: Record Frames
Frames offer a polished, gallery-like look. They protect your albums from dust and damage, making them a great choice for cherished pieces.
Look for frames designed specifically for LPs, as they often have a snug fit and easy opening mechanisms.
Option B: Invisible Wall Mounts/Clips
These minimalist clips hold the record in place, making it appear as if the album is floating directly on the wall.
They’re perfect for a clean, modern look, allowing the artwork to be the star without visual distractions.
Many designs also let you easily remove and play the record.
Option C: Display Shelves
Thin, shallow shelves are wonderful for showcasing multiple records and adding depth to your display.
They allow you to lean records against the wall, making it simple to rotate your collection with the seasons or your mood.
This method works beautifully for a more curated, lived-in feel.
Option D: Adhesive Wall Strips/Dots
For a commitment-free, renter-friendly option, adhesive strips or dots are fantastic.
They stick directly to the back of the record sleeve (or a protective inner sleeve you don’t mind sacrificing) and then to the wall.
Always choose reputable brands that promise clean removal to protect your walls.
Pro Tip: If you plan to play your records, choose a display method that allows for easy removal, like clips or shelves. For purely decorative pieces, frames or permanent adhesive solutions work well.
Step 3: Clean Your Records and Sleeves
Before hanging, give your record sleeves a gentle wipe-down with a soft, dry cloth.
Remove any dust or fingerprints to ensure they look their best on display.
This simple step makes a big difference in the final presentation.
Step 4: Plan Your Layout and Design
This is where the magic truly happens! Lay your chosen records on the floor in the exact arrangement you envision on your wall.
Experiment with different patterns: a neat grid, a scattered constellation, or a dynamic diagonal line.
Consider the color palette of your album art. Group similar colors together for harmony, or create vibrant contrasts for an energetic feel.
Think about the overall aesthetic of your room. A symmetrical grid often feels calm and orderly, while an eclectic, free-form arrangement can feel playful and artistic.
Snap a photo of your favorite layout with your phone. This way, you have a reference as you transfer your design to the wall.
Step 5: Measure and Mark Your Wall
Once you have your perfect layout, it’s time to bring it to life on the wall.
Using your measuring tape and pencil, lightly mark the exact spot where the top center (or mounting point) of each record will go.
Use your level to ensure each mark is perfectly straight, especially if you’re creating a grid or a line.
If using frames or shelves, measure the distance from the top of the frame/shelf to its hanging mechanism (e.g., the center of the keyhole or hanger).
This measurement helps you place your wall anchors accurately, ensuring everything hangs level and even.
Step 6: Install Your Chosen Mounts
Now, carefully install your hanging hardware according to your chosen method.
For frames or shelves, use a power drill for screws or gently tap in nails where you’ve marked.
Always use appropriate wall anchors if you’re drilling into drywall, especially for heavier frames or shelves, to ensure maximum security.
If you’re using invisible clips or adhesive strips, follow the manufacturer’s instructions closely for proper placement and curing times.
Patience here pays off; a secure mount means your records stay safely on display.
Step 7: Hang Your Records
With your mounts securely in place, it’s time for the exciting part: hanging your records!
Carefully place each record or framed record onto its designated mount.
Take a step back after each one to admire your progress and ensure everything looks balanced.
Adjust any records as needed to achieve that perfect, cohesive look you planned.
Step 8: Step Back and Admire Your Gallery
Your record wall is complete! Take a moment to truly appreciate the transformation.
Notice how the album art adds color, personality, and a cozy, inviting atmosphere to your room.
This is more than just decoration; it’s a reflection of your taste and passions.
Common Mistakes to Avoid
Not Planning the Layout First
Jumping straight into hanging without a clear plan can lead to a messy, uneven display.
You might end up with oddly spaced records or a layout that doesn’t quite fit your wall.
Always lay out your records on the floor first. This allows you to visualize the arrangement, adjust spacing, and make design decisions before committing to holes in your wall.
Using the Wrong Mounting Hardware
Attempting to hang heavy framed records with weak adhesive strips or small nails can lead to disaster.
The record could fall, damaging both the album and your wall.
Always match your mounting hardware to the weight of your records and frames. For heavier items, use screws with wall anchors. For lighter, unframed records, appropriate adhesive strips or specialized clips are best.
Ignoring the Level
Eyeballing whether a record is straight often results in a slightly crooked display, which can be surprisingly distracting.
A wall full of slightly tilted records can detract from the overall aesthetic.
Use a level consistently when marking your spots and installing your hardware. This ensures every record hangs perfectly straight, creating a clean and professional look.
Forgetting About Future Playability
If you love to listen to your records, permanently gluing them to the wall or using frames that are difficult to open can be frustrating.
You might find yourself wishing you could easily access your music.
Consider your listening habits when choosing a display method. Opt for open clips, shelves, or easily accessible frames if you want to enjoy your collection both visually and audibly.
Troubleshooting
Record Keeps Slipping or Falling
This usually indicates insufficient support or incorrect installation of your mounting hardware.
If using adhesive strips, ensure the wall surface was clean and dry before application, and that you pressed firmly for the recommended time.
For clips or shelves, check that the screws or nails are securely fastened into the wall, ideally into a stud or with appropriate anchors.
Sometimes, the record itself might be too heavy for the chosen mount; consider a more robust hanging solution.
Records Look Crooked Despite Using a Level
Even with a level, slight misalignments can happen if the hanging mechanism on the back of your frame or clip isn’t perfectly centered, or if you’ve marked your points slightly off.
Double-check the hanging point on the record frame or clip itself. It might be slightly off-center, causing the record to hang askew.
You can often make minor adjustments by gently shifting the record on its hook or by adding a small piece of removable adhesive putty to one corner of the record to gently nudge it into alignment.
Wall Damage After Removing an Adhesive Mount
This often happens if the adhesive strip was not removed correctly or if it was left on for too long, especially in humid conditions.
Always follow the manufacturer’s instructions for removal, which usually involves slowly pulling the tab straight down, parallel to the wall, rather than pulling it outwards.
If damage occurs, a little spackle and touch-up paint can usually fix it. Consider using a less aggressive adhesive or a different mounting method for future displays.
Key Takeaways
- Plan your layout first: Lay out records on the floor to visualize and refine your design before hanging.
- Choose the right mount: Select frames, clips, shelves, or adhesives based on your aesthetic, budget, and desire for playability.
- Measure and level precisely: Use a measuring tape and level for accurate placement, ensuring a clean, professional look.
- Prioritize wall safety: Use appropriate hardware and wall anchors for secure mounting and to prevent damage.
- Consider future access: If you plan to play your records, choose mounts that allow for easy removal and re-hanging.
- Clean records beforehand: A quick wipe ensures your album art shines brightly on your wall.
Frequently Asked Questions
Can I hang records without damaging them or the wall?
Absolutely! The key is choosing the right mounting method and following instructions carefully. Using specialized record clips or removable adhesive strips can protect both your records and your walls. For framed records, proper installation with screws and anchors prevents damage.
How far apart should I space my records?
This depends on your desired aesthetic. For a clean grid, aim for 1-2 inches of space between each record. For a more organic, scattered look, you can vary the spacing, ensuring there’s enough room for each album cover to be appreciated without feeling cramped.
What if my wall isn’t perfectly flat?
Slight imperfections in a wall can make hanging tricky. For minor unevenness, using flexible adhesive strips or clips that conform slightly to the wall might work best. For more significant issues, shelves can often mask imperfections, or you might consider hanging a larger piece of plywood or corkboard first, and then mounting your records to that.
Can I hang valuable or rare records?
You certainly can, but take extra precautions. For valuable records, framing them with UV-protective, archival-quality glass is highly recommended to prevent fading and damage. Ensure the frame provides a secure, dust-free environment, and use robust, well-installed hanging hardware to prevent falls.
Our Top Recommended Finds
- Clear Acrylic Wall Mounts: These virtually disappear, letting your album art truly pop while allowing easy record removal.
- Minimalist Record Display Shelves: Perfect for creating a layered look and rotating your favorite albums with ease.
- Archival-Quality LP Frames: Ideal for protecting your most cherished or valuable records from dust and UV light, giving them a gallery finish.
Bring Your Music to Life Today
Imagine walking into a room that perfectly reflects your passions, where every glance at the wall sparks joy and memories.
Hanging your vinyl records is more than just decorating; it’s about crafting a space that feels uniquely yours, filled with stories and good vibes.
You now have all the tools and inspiration you need to transform your blank walls into a vibrant, musical masterpiece.
Don’t wait another moment. Pick out your first record, gather your supplies, and start creating that cozy, inspiring corner you’ve always dreamed of.