🎄 How To Put Lights On A Christmas Tree
There’s nothing quite like the soft, twinkling glow of a Christmas tree to transform your home into a festive sanctuary. For years, I’ve cherished the ritual of lighting our tree, discovering little tricks along the way to make it truly magical. This guide shares those insights, helping you create that perfect, cozy ambiance.

Quick Overview
Bringing your Christmas tree to life with lights is a wonderful journey that adds instant warmth and cheer to your space. You’ll learn how to approach lighting with intention, ensuring a balanced and beautiful display. Get ready to illuminate your festive season with confidence and creativity.
- Time needed: 1-3 hours (depending on tree size and detail)
- Difficulty: Beginner
- What you’ll need: Christmas tree, light strands, extension cords, zip ties or floral wire, a step stool (optional), a helper (optional but fun!)
Step-by-Step Instructions
Step 1: Gather Your Supplies and Set the Scene
Before the magic begins, a little preparation goes a long way. This initial phase sets the stage for a smooth and enjoyable decorating experience. Think of it as preparing your canvas for a masterpiece.
First, ensure your Christmas tree is securely in its stand, whether it’s a fresh cut evergreen or a beloved artificial one. Give it a gentle fluff if needed, allowing branches to settle into their natural positions. This helps you visualize where your lights will go.
Next, gather all your light strands. It’s a wise practice to test each strand individually before you begin. Plug them in to check for any burnt-out bulbs or faulty sections, saving you frustration later on. Discard or repair any broken strands now.
Consider the room’s layout and where your tree will be positioned. How will its glow interact with other elements in the room? Will it be a focal point, or contribute to a broader lighting scheme?
Pro Tip: Opt for warm white lights for a classic, cozy glow that complements almost any decor. If you love a vibrant look, colorful lights can create a playful, festive atmosphere, especially in a family room or kid’s space. Cool white lights offer a crisp, modern feel.
Step 2: Choose Your Lighting Style and Quantity
The type and number of lights you use dramatically impact the tree’s final look. This is where your personal aesthetic truly shines. Do you prefer subtle sparkle or dazzling brilliance?
A good rule of thumb is to aim for about 100 lights per foot of tree height for a standard glow. For a truly brilliant, show-stopping tree, double that to 200 lights per foot. Don’t be afraid to mix and match light types for depth.
Think about the size of your bulbs. Mini lights offer a delicate twinkle, while C7 or C9 bulbs provide a bolder, more traditional glow. LED lights are energy-efficient and stay cool to the touch, lasting longer than incandescent options.
Consider the color temperature of your lights. Warm white creates a soft, inviting ambiance, perfect for a cozy living room. Cool white offers a crisp, modern look. Multi-colored lights bring a joyful, whimsical feel, ideal for a festive family space.
Step 3: Begin Lighting from the Inside Out
This method ensures an even distribution of light, giving your tree a beautiful depth that shines from within. It prevents a “flat” appearance and highlights the tree’s natural structure.
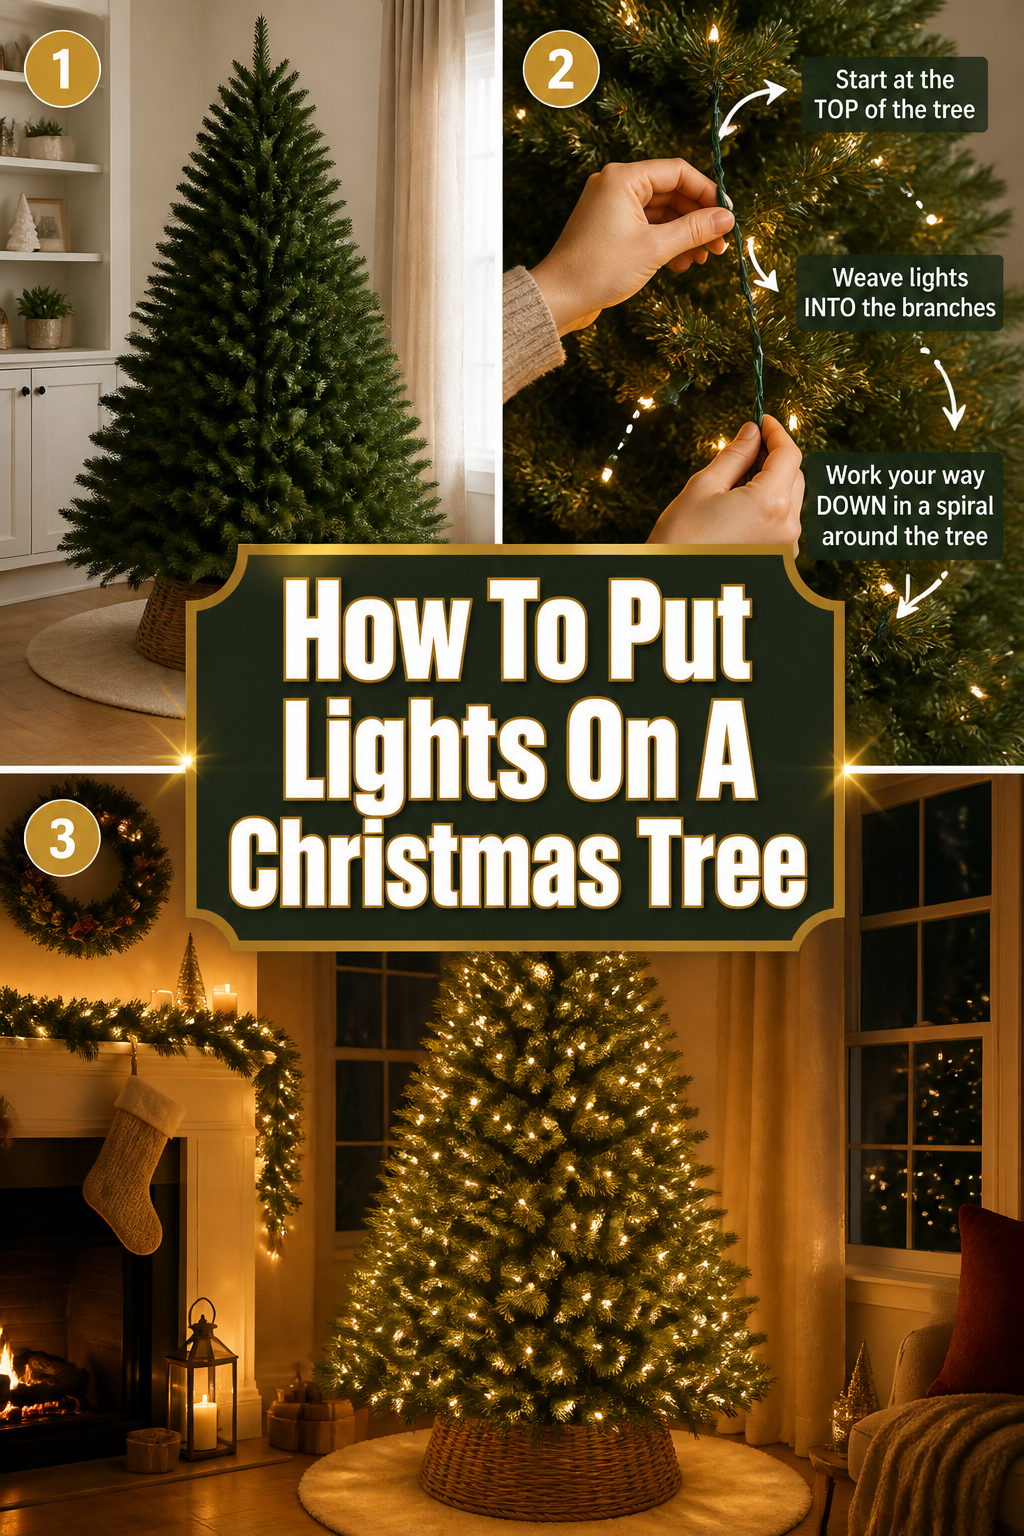
Start at the very top of your tree, near the trunk. Plug in your first strand of lights, ensuring the female end (the one you’ll plug subsequent strands into) is easily accessible near the base or a power source. This keeps your connections tidy.
Begin weaving the lights deep into the branches, working your way down and around the tree. Push some bulbs closer to the trunk, allowing them to illuminate the interior of the tree. This creates a rich, three-dimensional glow.
Move slowly, zig-zagging the strand from the trunk outward along a branch, then back inward. Repeat this process, moving down to the next branch level. This technique ensures every part of the tree catches the light, even the inner foliage.
Pro Tip: If you’re using multiple types of lights (e.g., mini lights and larger bulbs), apply the larger, more prominent bulbs first, scattering them evenly. Then, fill in with the smaller lights for a delicate twinkle.
Step 4: Wrap Each Major Branch
To achieve a truly professional, full look, wrap each significant branch individually. This technique uses more lights but yields stunning results, making your tree truly glow.
Once you’ve wrapped the trunk and inner branches, take the light strand and begin wrapping individual branches. Start at the base of a branch, near the trunk, and spiral the lights outwards towards the tip.
As you reach the tip of the branch, gently spiral the lights back towards the trunk. This ensures that lights are visible from all angles and provides a beautiful, layered effect. It also secures the lights better.
Continue this process for every major branch, working your way around and down the tree. Take your time, stepping back occasionally to assess the light distribution. Look for any dark spots that might need more attention.
Step 5: Connect Strands and Manage Cords
Seamless connections and hidden cords are key to a polished, magical display. Cluttered wires can distract from the beauty of your illuminated tree.
As you near the end of a light strand, locate the female end and connect it to the male end of your next strand. Try to keep these connections tucked away, either behind a branch or close to the trunk, for a cleaner look.
Most light strands allow you to connect several end-to-end, but always check the manufacturer’s recommendations for the maximum number. Overloading a circuit can be a fire hazard. Use extension cords if you need to reach farther.
Once all your lights are on, take a moment to gently tuck any visible cords deeper into the branches. You can use green zip ties or floral wire to discreetly secure cords to the branches, keeping them out of sight. This creates a cleaner, more professional appearance.
Step 6: Step Back and Adjust
The true beauty of your tree reveals itself when you take a broader perspective. This step is crucial for fine-tuning and ensuring an even, dazzling display.
Plug in all your lights and dim the room lights. Step away from the tree, moving to different vantage points in the room. Observe how the lights glow and interact with the space. Look for any areas that appear too dark or too bright.
Gently adjust any light bulbs or strands that seem out of place. You might need to pull some lights forward to the tips of branches, or push others deeper inside to fill a void. This iterative process helps achieve perfect balance.
Consider how the lights enhance your chosen aesthetic. Are they creating that warm, inviting glow you envisioned? Do they highlight the tree’s shape beautifully? Make small tweaks until you are completely satisfied with the overall effect.
Step 7: Add Ornaments and Topper
With your lights perfectly placed, your tree is now a brilliant canvas ready for its final adornments. The lights will make your ornaments sparkle and shine.
Begin hanging your ornaments, placing some deeper within the branches to catch the inner glow of the lights. Others can hang closer to the tips, reflecting the light outwards. Distribute them evenly for a balanced look.
Finally, crown your beautifully lit tree with a star, angel, or other topper. The lights provide a stunning backdrop, making your topper truly stand out. Take a moment to admire your handiwork.
Common Mistakes to Avoid
Not Testing Lights First
Skipping the simple step of plugging in each light strand before you begin can lead to significant frustration. Imagine meticulously wrapping an entire section of your tree only to discover a dead strand. You’ll have to undo all your hard work. Always test every strand first to save time and effort.
Using Too Few Lights
A common pitfall is underestimating the number of lights needed for a truly luminous tree. Sparse lighting can make a tree look dull and uninviting, lacking that magical holiday sparkle. Aim for at least 100 lights per foot of tree height for a good base, and more for extra brilliance.
Wrapping Only the Outer Branches
Focusing solely on the tips of the branches leaves the interior of the tree dark and flat. This creates a one-dimensional look, missing the opportunity for rich depth and a glowing core. Weave lights deep into the branches, close to the trunk, to achieve a full, multi-layered glow.
Ignoring Cord Management
Visible, tangled cords detract significantly from the beauty of your illuminated tree. A messy web of wires can be distracting and even a tripping hazard. Take the time to tuck cords behind branches or secure them discreetly with zip ties for a clean, professional finish.
Troubleshooting
A Section of Lights is Out
This is a very common issue, often caused by a single faulty bulb or a loose connection. First, check the plug where the strand connects to power or to another strand, ensuring it’s fully inserted. Then, meticulously examine each bulb in the affected section.
Look for any loose, broken, or discolored bulbs. Many light strands are wired in series, so one bad bulb can cause an entire section to go dark. Replace any suspicious bulbs with new ones, often provided in a small bag with your light set.
Lights are Dim or Flickering
Dim or flickering lights often indicate a power issue. Check that the light strand is not overloaded by too many connected strands, exceeding the manufacturer’s recommended limit. This can draw too much power and cause instability.
Also, ensure the outlet you’re using isn’t overloaded with other high-power devices. Try plugging the lights into a different outlet or reducing the number of strands connected to a single extension cord. Sometimes, a slightly loose bulb can also cause flickering, so check all connections.
Lights Keep Tripping a Breaker
If your lights repeatedly trip a circuit breaker, it means you’re drawing too much power from that circuit. This is a safety mechanism to prevent overheating. The most likely culprit is connecting too many light strands to a single outlet or extension cord.
Distribute your light strands across multiple outlets in different rooms if possible, or use heavy-duty extension cords. Check the wattage of your lights and the capacity of your circuit breaker. Consider switching to LED lights, which consume significantly less power.
Key Takeaways
- Test All Strands: Always plug in and check each light strand before you begin decorating to avoid frustration later.
- Quantity Matters: Aim for at least 100 lights per foot of tree height for a vibrant, full glow.
- Light from Within: Weave lights deep into the branches, near the trunk, for depth and a beautiful multi-dimensional effect.
- Wrap Each Branch: Spiral lights outwards and inwards on individual branches for even distribution and a professional finish.
- Manage Cords: Tuck away and secure all cords and connections for a clean, polished look.
- Step Back and Adjust: Regularly observe your tree from a distance to identify and correct any dark spots or unevenness.
Frequently Asked Questions
How many light strands do I need for my tree?
A general guideline is to use 100 lights per foot of tree height for a standard glow. For example, a 7-foot tree would need about 700 lights. If you prefer a very bright, full tree, consider doubling that to 200 lights per foot.
Should I use LED or incandescent lights?
LED lights are generally recommended because they are more energy-efficient, last much longer, and stay cool to the touch, reducing fire risk. Incandescent lights offer a classic, warm glow that some people prefer, but they consume more power and generate heat.
When should I put lights on my artificial tree?
For artificial trees, it’s easiest to put the lights on before you add any ornaments. This allows you to weave the strands deeply into the branches and make adjustments without ornaments getting in the way. If your artificial tree is pre-lit, you can skip this step and go straight to ornament hanging.
Can I mix different types of lights on one tree?
Yes, absolutely! Mixing different types of lights can add wonderful depth and visual interest. For instance, you could use larger C7/C9 bulbs for a prominent, traditional glow, and then fill in with smaller mini lights for a delicate twinkle. Just ensure all strands are in good working order and safely connected.
Our Top Recommended Finds
- Warm White LED Mini Lights: These provide a classic, cozy glow, are energy-efficient, and stay cool to the touch, perfect for any tree.
- Green Zip Ties: Inexpensive and incredibly useful for discreetly securing light cords to branches, keeping everything neat and tidy.
- Light Tester and Repair Kit: A small investment that pays off big time, helping you quickly identify and fix issues with problematic light strands.
Illuminate Your Winter Wonderland
The act of lighting your Christmas tree is more than just a task; it’s an invitation to usher warmth, beauty, and tradition into your home. Each twinkling bulb contributes to the festive ambiance, transforming your space into a cozy haven. Imagine the soft glow reflecting off ornaments, casting dancing shadows on your walls, and creating a focal point that draws everyone in.
Don’t let the thought of tangled wires deter you from creating this magic. With these practical steps, you’re empowered to craft a truly breathtaking display. Begin today, embrace the process, and watch as your home fills with that unmistakable holiday spirit. Your perfectly lit tree will become a cherished centerpiece, inspiring joy and warmth throughout the season.