✨ How To Hide TV Cords Mounted TV
There’s nothing quite like the feeling of stepping into a beautifully organized, cozy living space.
But often, the magic of a wall-mounted TV is broken by a tangled web of visible cords, distracting from your carefully curated aesthetic.
I’ve been there, staring at those unsightly cables, and I’ve transformed my own home into a serene haven by tackling this very issue, so let me guide you to a cleaner, calmer setup.

Quick Overview
This guide will walk you through transforming your mounted TV area from a cord-cluttered eyesore into a seamless, stylish focal point.
You’ll learn practical methods to conceal cables, enhancing your room’s overall design and tranquility.
- Time needed: 1-4 hours (depending on chosen method and tools)
- Difficulty: Beginner to Intermediate
- What you’ll need: Measuring tape, pencil, stud finder, drill, screwdriver, utility knife, safety glasses, cord covers or in-wall cable kit, zip ties, electrical tape, paint (optional).
Step-by-Step Instructions
Step 1: Assess Your Setup and Vision
Before you begin, take a good look at your current TV setup and visualize the outcome.
Consider the distance your cords need to travel and where your power outlet is located.
- Observe where the cords currently hang and where they need to reach a power source or media console.
- Imagine the clean lines you want to achieve, thinking about the overall flow of your room.
Pro Tip: Snap a “before” photo! It’s incredibly satisfying to see the transformation later, and it helps you plan your cord routing.
Step 2: Gather Your Tools and Materials
Having everything at hand makes the process smoother and more enjoyable.
A little preparation goes a long way in preventing frustrating interruptions.
- Collect all the tools listed in the “What you’ll need” section.
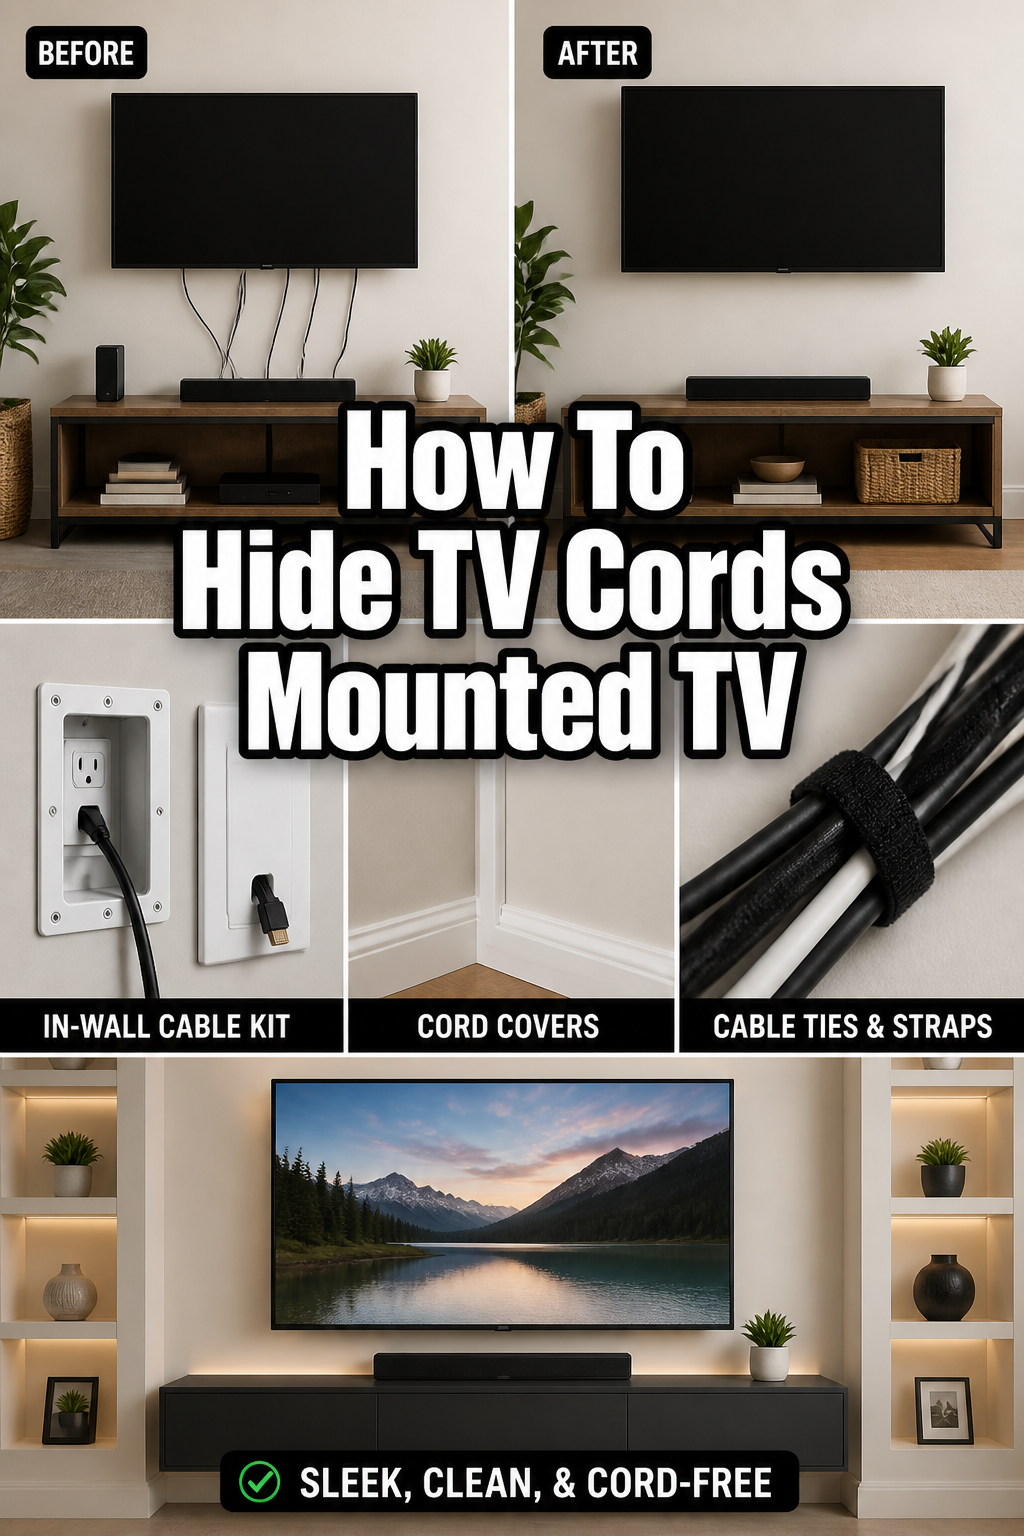
- Choose your cord-hiding method: external cord covers or an in-wall cable management kit. External covers are simpler; in-wall kits offer a completely invisible solution.
- Ensure you have enough cord length for your devices once hidden.
Step 3: Disconnect and Organize Cords
Safety first! Always unplug your TV and all connected devices before working with their cords.
This also gives you a fresh start to untangle any existing mess.
- Unplug your TV and all peripheral devices (soundbar, streaming box, gaming console).
- Label each cord with a piece of tape indicating what it connects to. This saves immense confusion later.
- Bundle similar cords together loosely with zip ties or Velcro straps.
Step 4: Choose Your Cord Hiding Method
This is where you decide on the best approach for your home and comfort level.
Both external and in-wall options offer great results, just with different levels of effort.
- Option A: External Cord Covers (Surface Mount)
This method is excellent for renters or those who prefer a less invasive solution.
Cord covers adhere to your wall and can be painted to blend seamlessly.
- Measure the length of the path from your TV to your power outlet/media console.
- Cut the cord cover channels to the appropriate size using a utility knife or saw.
- Test the placement on the wall with a pencil mark before peeling the adhesive backing.
- Option B: In-Wall Cable Management Kit
For a truly invisible look, an in-wall kit routes cables through the wall itself.
This requires a bit more effort and comfort with basic DIY tasks.
- Locate studs in your wall using a stud finder. You’ll need to cut holes between studs.
- Mark two points on the wall: one directly behind your TV and another lower down, near your power outlet or media console. Ensure these points are between studs.
- Check for any electrical wires or pipes within the wall using an inspection camera if you’re unsure.
Step 5: Implement Your Chosen Method
Now it’s time to put your plan into action and make those cords disappear.
Take your time and enjoy the process of creating a cleaner space.
- For External Cord Covers:
- Attach the bottom channel piece of the cord cover to the wall, pressing firmly along its length.
- Lay your organized cords inside the channel.
- Snap the top cover piece securely into place over the cords.
- Paint the cord cover to match your wall color for a truly integrated look.
- For In-Wall Cable Management Kit:
- Drill pilot holes at the top and bottom marked locations.
- Cut out the rectangular or circular openings for the cable pass-through plates using a drywall saw.
- Feed the cables from the top opening down to the bottom opening using a fish tape or the kit’s included guide wire.
- Install the decorative pass-through plates over the holes, securing them according to the kit instructions.
Pro Tip: When feeding cables in-wall, attach power cables and signal cables (HDMI, optical) to separate ends of your fish tape. This helps prevent tangling and makes the pull smoother.
Step 6: Reconnect and Test
With your cords neatly hidden, it’s time to bring your entertainment system back to life.
This is a crucial step to ensure everything works perfectly.
- Plug each labeled cord back into its correct port on the TV and devices.
- Plug the TV and devices back into the power outlet.
- Power on your TV and test all connected devices to confirm they are receiving power and signal.
Step 7: Final Adjustments and Aesthetic Touches
Stand back and admire your handiwork! A few final touches can make all the difference.
This is where your cozy aesthetic truly shines.
- Tidy any remaining visible cords behind your media console using zip ties or Velcro straps.
- Arrange decorative items like plants, books, or art around your TV area to further enhance the clean look.
- Consider a small, stylish basket or box near the console to hide power strips or excess cable length.
Common Mistakes to Avoid
Forgetting to Label Cords
Many people skip this small but vital step, leading to immense frustration later.
Trying to guess which cord goes where after they’re hidden can turn reconnection into a puzzle.
Always take a moment to label each cable before you disconnect it; a simple piece of painter’s tape and a pen work wonders.
Not Checking for Studs or Obstructions
When going the in-wall route, drilling or cutting without knowing what’s behind your drywall is a recipe for disaster.
You could hit electrical wiring, water pipes, or structural studs, causing significant damage and safety hazards.
Always use a reliable stud finder and, if possible, an inspection camera to check for obstructions before making any cuts.
Underestimating Cord Length Needed
It’s easy to assume your existing cords are long enough, but once you route them through covers or walls, you might find them too short.
This forces you to buy new, longer cables, delaying your project and adding unexpected costs.
Measure the intended path carefully and consider purchasing longer HDMI or power cables if needed, especially for in-wall applications, before you start.
Over-stuffing Cord Covers
Trying to cram too many cables into a cord cover can make it difficult to close properly, or even damage the cables themselves.
It also looks bulky and defeats the purpose of a sleek, hidden appearance.
Choose cord covers that are appropriately sized for the number and thickness of your cables, or use multiple channels if necessary to maintain a tidy look.
Troubleshooting
Cables Won’t Fit in Cord Cover
If you’re struggling to close your cord cover after placing the cables inside, it’s likely overstuffed.
Forcing it can damage the cover or the cables, and it won’t look neat.
Remove some cables, or consider using a larger cord cover. Alternatively, you might need a second, thinner cord channel for overflow cables.
No Signal After Reconnecting TV
This is a common issue that often points to a loose connection or a mislabeled cable.
Don’t panic; it’s usually an easy fix.
Double-check that all HDMI, optical, and power cables are securely plugged into their correct ports on both your TV and devices. Refer to your labels to ensure no mix-ups occurred.
In-Wall Cable Won’t Drop Down
Sometimes, cables can get snagged on insulation or internal wall structures when trying to feed them through.
This can be frustrating, especially if you’re working with a long run.
Try gently wiggling the fish tape or cable while feeding it. If it’s truly stuck, you might need to try a different entry angle or consider a smaller, more flexible cable snake if you have one.
Key Takeaways
- Planning your cord routing and choosing the right method is the first step to a beautiful space.
- Labeling all your cables before disconnecting them saves significant time and frustration during reconnection.
- Whether using external covers or in-wall kits, proper measurement and careful installation ensure a professional finish.
- Always prioritize safety by unplugging devices and checking for wall obstructions before cutting or drilling.
- A clean, cord-free TV area significantly enhances the overall coziness and aesthetic appeal of your room.
- Don’t forget the final styling touches; decorative elements can further integrate your TV into the room’s design.
Frequently Asked Questions
Is it safe to run power cords inside the wall?
Standard power cords for your TV and devices should not be run inside the wall directly, as this violates most electrical codes and can be a fire hazard. Instead, use an in-wall power extension kit specifically designed for this purpose. These kits typically include a recessed power inlet and outlet, ensuring safety and compliance.
Can I hide cords without drilling into the wall?
Absolutely! External cord covers are a fantastic no-drill solution. They adhere to the surface of your wall and can be painted to match, making them blend in beautifully. You can also use creative furniture placement, such as placing a console table directly beneath the TV, to obscure cords.
How do I know what size cord cover to buy?
First, gather all the cables you intend to hide together. Measure their combined width and height. Then, look for cord covers that have an internal channel large enough to comfortably accommodate this bundle. It’s always better to go slightly larger than too small, to avoid over-stuffing.
What if my wall is brick or concrete?
Hiding cords in brick or concrete walls requires specialized tools like a hammer drill and masonry bits, and often involves creating channels in the wall itself. For a less invasive approach, external cord covers are definitely your best bet. You can also run cords along the baseboard using covers designed for that purpose.
Our Top Recommended Finds
- Paintable Cord Covers: These adhesive channels attach to your wall and can be painted to seamlessly blend with your decor, making cords virtually disappear.
- In-Wall Cable Management Kit with Power: A comprehensive solution that includes everything you need to safely route power and low-voltage cables behind your drywall, complete with power outlets.
- Velcro Cable Ties: Reusable and gentle on cables, these are perfect for bundling and organizing excess cord length behind your TV or inside media consoles.
Craft Your Cozy, Cord-Free Sanctuary
Imagine your living room, transformed. No more distracting cables, just clean lines and a sense of calm.
This small project yields a huge impact on your home’s ambiance and your peace of mind.
Don’t let visible wires detract from the beautiful space you’ve worked so hard to create; take the first step today and reclaim your aesthetic serenity!