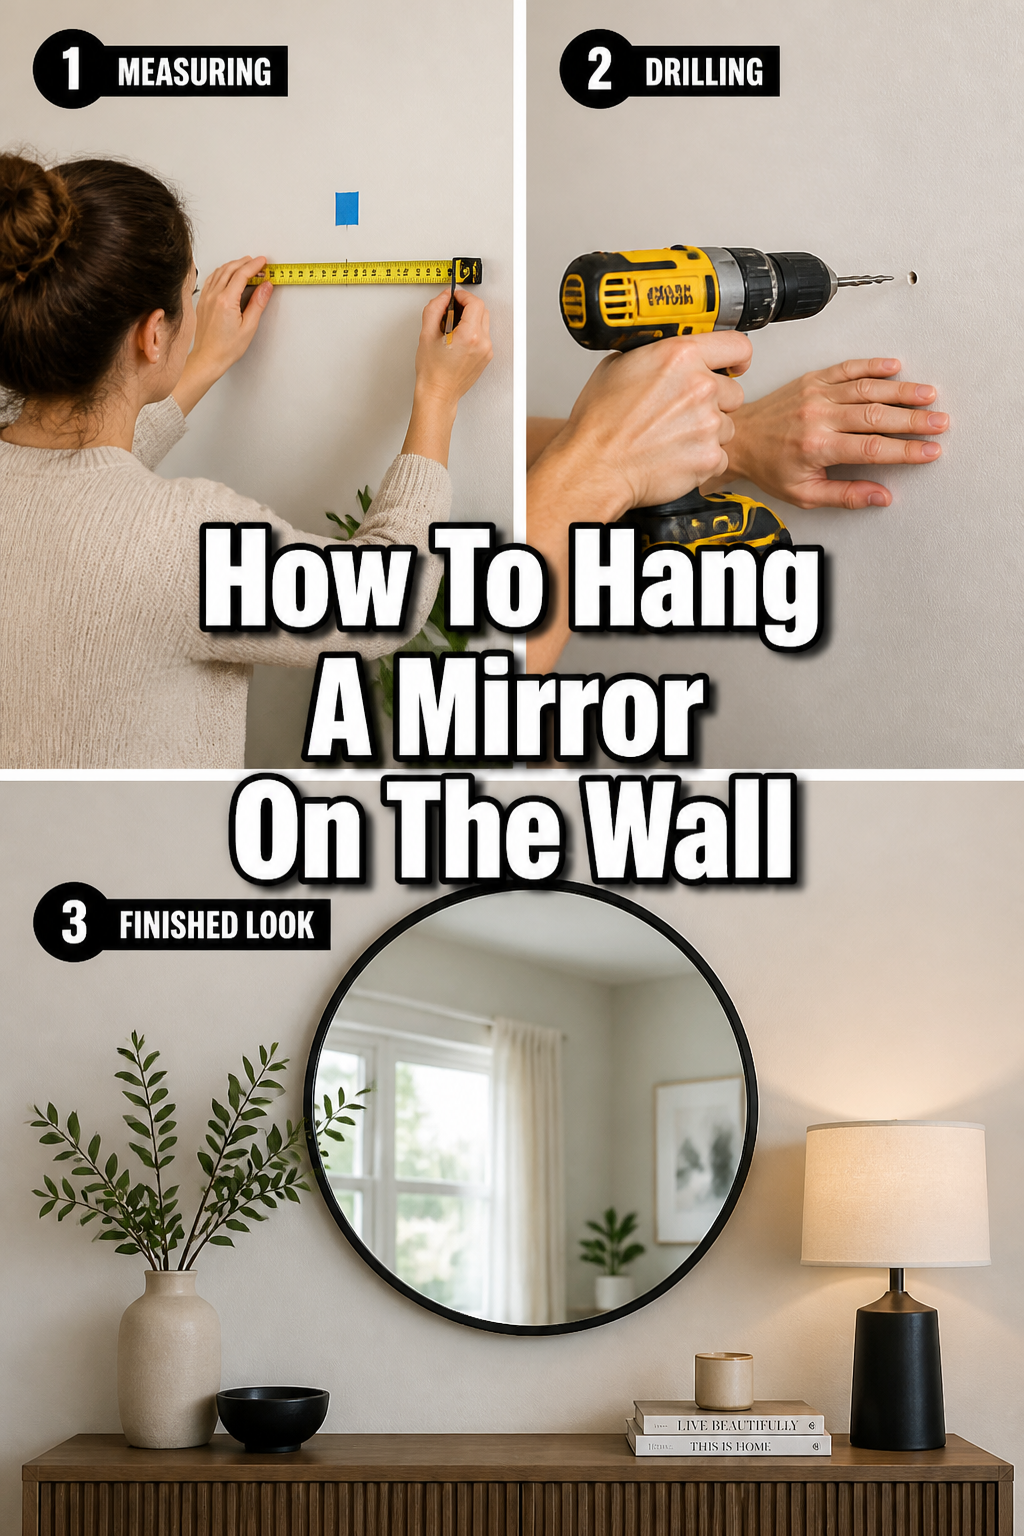
How To Hang A Mirror On The Wall
There’s a special kind of magic that a well-placed mirror brings to a home.
It can transform a room, making it feel brighter, more spacious, and infinitely more inviting.
I remember the first time I hung a large, ornate mirror in my tiny living room; it felt daunting, but the result was pure joy, and I’m excited to share that confidence with you.

Quick Overview
You’re about to embark on a wonderfully rewarding home improvement project.
By the end of this guide, your chosen mirror will be securely and beautifully displayed, enhancing your living space with light and style.
- Time needed: 30 minutes to 1.5 hours (depending on mirror size and wall type)
- Difficulty: Beginner
- What you’ll need: Pencil, measuring tape, level, stud finder, drill, appropriate wall anchors/screws, screwdriver, safety glasses, a helper for larger mirrors.
Step-by-Step Instructions
Step 1: Dream and Design Your Spot
Before any tools come out, take a moment to envision your mirror’s purpose and placement.
Think about how it will reflect light, open up a cozy nook, or become a focal point above a console table.
Consider the room’s flow and what the mirror will reflect – a beautiful plant, a window with a view, or a captivating piece of art.
Pro Tip: Hold the mirror (or a piece of cardboard cut to its size) against different spots on the wall. This helps you visualize the impact on your room’s aesthetics and ensures it’s at a comfortable viewing height. For a dining area, reflecting a chandelier can add incredible sparkle.
Step 2: Gather Your Tools and Assess Your Mirror
Lay out all your necessary tools within reach. Having everything ready saves time and frustration.
Now, carefully examine the back of your mirror. Does it have a wire, D-rings, a French cleat, or keyhole hangers?
Understanding the hanging mechanism is crucial for choosing the right hardware and method.
Step 3: Mark Your Mirror’s Hanging Points
With your mirror safely on a soft surface, measure the distance between the hanging points on its back.
If it has a wire, pull it taut and measure from the top of the mirror to the top of the wire when stretched.
For D-rings or keyholes, measure the exact distance between their centers.
Pro Tip: If using a wire, a single picture hook or anchor might suffice. For D-rings or keyholes, you’ll likely need two anchors, spaced precisely. Accuracy here prevents crooked hanging.
Step 4: Locate Your Studs (or Choose Anchors Wisely)
Using a stud finder, carefully scan the wall where you plan to hang the mirror.
Mark the center of any studs you find with a light pencil mark.
Hanging into a stud is always the strongest and safest option, especially for heavy mirrors.
If studs aren’t where you need them, you’ll use wall anchors appropriate for your wall type (drywall, plaster, etc.) and the mirror’s weight.
Pro Tip: For very heavy mirrors, even if you hit a stud, consider using a French cleat system. This distributes the weight across a wider area and provides exceptional stability, perfect for creating a grand statement piece. Always check the anchor’s weight rating.
Step 5: Mark Your Wall with Precision
Transfer your mirror’s hanging measurements to the wall.
Decide on the desired height for the top of your mirror, or its center if you prefer.
Lightly mark this point with your pencil.
From this reference point, measure down and mark where your actual hardware will go, using the measurements from Step 3.
Pro Tip: Use a level to ensure your marks are perfectly horizontal, especially for two-point hanging systems. A slight tilt will be very noticeable once the mirror is up. For a gallery wall, starting with the largest piece (your mirror) helps anchor the composition.
Step 6: Install Your Wall Hardware
Based on your marks and whether you’re drilling into a stud or using anchors, proceed with installing your hardware.
If drilling into a stud, pre-drill a pilot hole slightly smaller than your screw’s diameter, then drive in your screw.
If using anchors, follow the manufacturer’s instructions carefully for drilling the correct size hole and inserting the anchor before driving the screw.
Pro Tip: Wear safety glasses when drilling. Ensure screws are driven in firmly but not overtightened, especially into anchors, to avoid stripping. Leave enough of the screw head exposed for the mirror’s hanging mechanism to rest securely.
Step 7: Enlist a Helper and Hang the Mirror
For any mirror larger than a hand-held compact, absolutely call in a friend or family member.
Teamwork makes hanging safer and much easier.
Carefully lift the mirror together, aligning its hanging points with the hardware on the wall.
Gently lower it into place, making sure it settles securely.
Pro Tip: Communicate clearly with your helper. “Left a little,” “down slowly,” and “steady” are your best friends. Take a deep breath and work together to get it just right. This is the exciting moment your design vision comes to life!
Step 8: The Final Level Check and Admire
Once the mirror is resting on its hardware, step back and admire your work.
Use your level one last time across the top of the mirror to confirm it’s perfectly straight.
Make any tiny adjustments needed to achieve that flawless, balanced look.
Then, take a moment to truly appreciate how your beautifully hung mirror transforms the room, adding that touch of cozy elegance you envisioned.
Common Mistakes to Avoid
Ignoring Wall Type and Mirror Weight
Many people assume one type of screw or anchor fits all situations. This is a common and potentially dangerous mistake.
A heavy mirror on a flimsy drywall anchor can quickly lead to a crashed mirror and damaged wall.
Always identify if your wall is drywall, plaster, or masonry, and choose hardware specifically rated for your mirror’s weight and wall type.
Not Using a Level
Eyeballing whether a mirror is straight rarely works out in the long run. Even a slight tilt becomes incredibly distracting over time.
Always use a level, even for smaller mirrors, to ensure your marks are perfectly horizontal before drilling.
A few extra seconds with a level saves you from constant annoyance or having to re-hang the mirror.
Forgetting About Studs (or Not Using a Stud Finder)
Skipping the stud finder is a missed opportunity for maximum security. Screwing directly into a wall stud provides the strongest possible hold.
Always use a stud finder to locate these structural supports and prioritize them, especially for heavier mirrors.
If a stud isn’t available, only then turn to appropriate wall anchors.
Troubleshooting
Mirror Appears Crooked
This is often due to imprecise marking or the mirror’s hanging wire shifting slightly.
First, double-check with your level. If it’s only slightly off, you might be able to gently adjust the mirror on its hanger.
If it’s significantly crooked, you’ll need to remove the mirror, re-measure your hanging points on the wall, and possibly move one of your anchors or screws slightly.
Small adjustments to screw depth can sometimes help, but often re-drilling one side slightly offset is the best fix.
Mirror Feels Wobbly or Unsecure
A wobbly mirror indicates that your hardware isn’t holding firmly enough, which is a safety concern.
This usually means the anchor isn’t properly installed, or it’s not rated for the mirror’s weight.
Immediately remove the mirror.
If using an anchor, ensure it’s fully expanded and flush with the wall, or replace it with a heavier-duty toggle bolt or molly bolt, making sure it’s appropriate for your wall type and the mirror’s weight.
If you were aiming for a stud, check if you truly hit the center; if not, try again or use a robust anchor.
Key Takeaways
- Plan Your Placement: Visualize how the mirror enhances light and space before you start.
- Know Your Hardware: Match your mirror’s hanging mechanism and weight to the correct wall anchors.
- Find Those Studs: Always prioritize hanging into wall studs for maximum security.
- Level Up: Use a level religiously for perfectly straight and aesthetically pleasing results.
- Teamwork Makes the Dream Work: Enlist a helper for larger mirrors to ensure safety and ease of installation.
Frequently Asked Questions
How high should I hang a mirror?
A general guideline is to hang the mirror so its center is at eye level for an average person, typically around 57-60 inches from the floor.
However, this can vary based on its purpose; above a console table, it should be about 6-8 inches above the furniture.
Consider what you want it to reflect and adjust accordingly for the best visual impact.
Can I hang a heavy mirror on drywall?
Yes, but you absolutely must use the correct hardware.
Avoid simple nails or plastic screw-in anchors for heavy mirrors.
Instead, opt for heavy-duty drywall anchors like toggle bolts or molly bolts, which are designed to expand behind the drywall and distribute weight effectively.
Always check the anchor’s weight rating and your mirror’s actual weight.
What if my mirror doesn’t have a hanging wire or D-rings?
Some mirrors, especially frameless ones, might come with pre-attached metal plates or keyhole slots.
Others might be designed to be hung with mirror clips or J-channels, which attach to the wall and cradle the mirror’s edges.
If your mirror has no hardware, you can often add D-rings or a hanging wire yourself using mirror hardware kits available at home improvement stores.
Creating Your Haven, One Mirror at a Time
You’ve done it! Your mirror is now beautifully and securely hung, reflecting not just your room, but also your newfound confidence.
Isn’t it amazing how a single decorative piece can utterly transform the feeling of a space?
This project is just the beginning of making your home truly yours.
Now that you’ve mastered the art of hanging a mirror, think about other ways you can infuse your personality into your surroundings.
Perhaps a gallery wall of cherished photos, or a floating shelf displaying your favorite cozy items?
Every small update builds towards that perfectly curated, comforting sanctuary you deserve.
Keep exploring, keep creating, and enjoy the beautiful home you’re building.