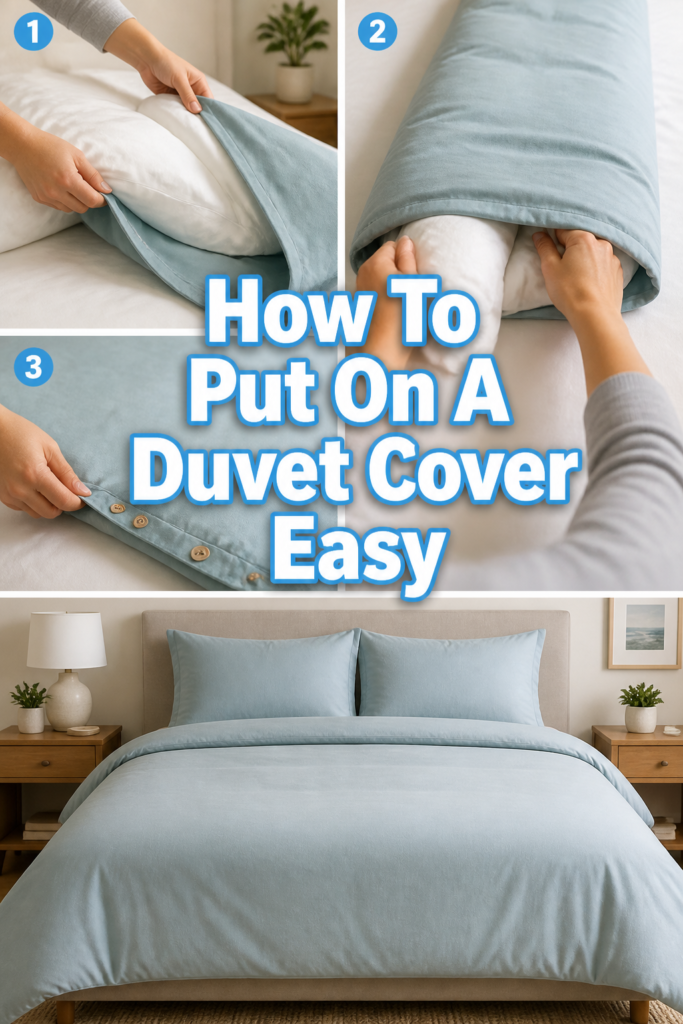
🛌 How To Put On A Duvet Cover Easy
Oh, the duvet cover dance! We’ve all been there, wrestling with a giant fabric sack, trying to coax a fluffy insert into submission.
For years, I found myself tangled in a textile knot, dreading laundry day just for this one task.
But fear not, fellow comfort-seekers! I’ve mastered the art, and I’m here to share the simple steps to transform your bed into a serene, stylish sanctuary, no wrestling required.
Quick Overview
Transforming your bed from disheveled to dreamy is simpler than you think. This guide will help you achieve a perfectly made duvet in minutes.
You’ll learn a clever technique that makes the process effortless, leaving you with more time to enjoy your beautiful, cozy space.
- Time needed: 10-15 minutes
- Difficulty: Beginner
- What you’ll need: Your duvet insert, your duvet cover, a clean bed or floor space.
Step-by-Step Instructions
Step 1: Prepare Your Canvas
Before you begin, make sure your bed is clear. Remove all pillows, decorative throws, and any existing bedding.
A tidy workspace is a happy workspace, and it prevents any accidental snags or tumbles.
Clear the floor around your bed too, giving yourself ample room to move freely without obstruction.
Pro Tip: Consider the size of your duvet and cover. A king-sized duvet might be easier to manage on a clean floor, especially if your bed isn’t large enough to spread it out fully. This gives you more leverage.
Step 2: Turn the Cover Inside Out
This is where the magic begins. Take your duvet cover and turn it completely inside out.
Imagine it like a sock that needs to be pulled right-side out later; you want its “wrong” side facing you now.
Lay the inside-out duvet cover flat on your bed or the clean floor. Ensure it’s spread out as smoothly as possible, with the opening at the foot of the bed or towards you.
Step 3: Align the Duvet Insert
Now, take your duvet insert and lay it directly on top of the inside-out duvet cover.
Make sure all four corners of the duvet insert match up as closely as possible with the four corners of the duvet cover.
Try to get the edges to align too, creating one neat, stacked rectangle of fabric.
Pro Tip: If your duvet insert has a “top” and “bottom” (some are thicker at one end), orient it correctly now. This ensures your bed feels just right when you’re finished.
Step 4: Secure the Corners
This crucial step prevents your duvet from shifting and bunching inside its cover later.
Most duvet covers have ties in each corner; if yours does, tie each corner of the duvet insert to the corresponding tie inside the cover.
If your cover doesn’t have ties, consider investing in some duvet clips or loops. They’re a small addition that makes a huge difference in comfort and aesthetics.
Repeat this for all four corners, ensuring a snug and secure connection. This little act of securing the corners will save you so much frustration down the line, keeping your duvet perfectly in place.
Step 5: Roll it Up Like a Burrito
Starting from the closed end of the duvet cover (the end opposite the opening), begin to roll both the duvet insert and the inside-out cover together.
Roll them up tightly and evenly, just like you would roll a sleeping bag or a delicious burrito.
Keep the edges aligned as you roll, working your way down towards the open end of the duvet cover.
You’ll end up with a long, tightly rolled cylinder of fabric at the foot of your bed.
Step 6: Flip and Unfurl
Now for the satisfying reveal! With the rolled bundle in front of you, reach inside the opening of the duvet cover.
Grab the far end of the rolled bundle (which is actually the top corners of your duvet and cover, now inside out and rolled up).
Pull the duvet cover opening over the rolled bundle, essentially turning the cover right-side out as you unroll it simultaneously.
It’s like peeling a banana, but with more fabric. As you pull, the duvet cover will gradually encompass the duvet insert.
Work your way down the roll, pulling the cover over the insert until the entire duvet is encased and the cover is right-side out.
Step 7: Shake it Out
Once the duvet insert is fully inside the cover, hold the top two corners of the duvet cover (where your duvet ties are securely fastened).
Lift the duvet high and give it a good, vigorous shake.
Let gravity do its work, helping the duvet insert settle evenly into all corners of the cover.
You might need to adjust the sides and bottom with your hands, gently coaxing the duvet into place.
This step ensures there are no lumpy spots or empty pockets, just smooth, even fluffiness.
Step 8: Fasten the Opening
Now that your duvet is perfectly nestled, it’s time to close the opening at the foot of the bed.
Most duvet covers have buttons, zippers, or snaps. Secure these fasteners to keep your duvet insert safely tucked inside.
Take your time with this, ensuring all buttons are fastened or the zipper is fully closed for a neat finish.
A fully closed cover prevents your duvet from peeking out or getting dislodged during the night.
Step 9: Smooth and Style
Stand back and admire your work! Smooth out any remaining wrinkles on the duvet cover with your hands.
Fluff your pillows, arrange your decorative cushions, and add any throws or blankets to complete your bed’s inviting look.
A well-made bed instantly elevates the entire room, creating a focal point of comfort and style. It’s truly the heart of a cozy bedroom.
Common Mistakes to Avoid
The Stuffing Struggle
Many people try to stuff the duvet insert into the cover from the opening, corner by frustrating corner. This often leads to a tangled mess, an unevenly distributed duvet, and a lot of unnecessary effort. It’s the most common mistake and the most difficult method.
Instead, embrace the “burrito” method outlined above. By turning the cover inside out and rolling, you’re guiding the duvet into place with far greater control and ease, saving your sanity and your back.
Ignoring Corner Ties
If your duvet cover has corner ties, but you don’t use them, your duvet insert will inevitably shift and clump inside the cover. This creates an uncomfortable sleeping experience and an unsightly, lumpy bed. It defeats the purpose of having a duvet.
Always take the extra minute to secure all four corners. If your cover lacks ties, consider sewing some in or using duvet clips. This simple act keeps everything neatly in place, ensuring a smooth and cozy slumber.
Wrong Size Match
Using a duvet insert that is too small for its cover will result in excess fabric and a lack of fullness. Conversely, an insert that’s too large will be squished and lumpy, never quite fitting correctly. Both scenarios detract from the aesthetic and comfort.
Always double-check the dimensions of both your duvet insert and your cover before purchasing. A perfect match ensures a beautifully plump and evenly distributed duvet, enhancing your room’s overall design.
Rushing the Process
Trying to quickly yank and pull the duvet into place can lead to tears in the fabric, uneven distribution, and frustration. Speed often compromises precision, especially with delicate bedding. It’s a task that benefits from a calm approach.
Take your time with each step, especially the rolling and flipping. A few extra moments of careful attention will result in a perfectly made bed that looks and feels much better, reflecting a mindful approach to your home.
Troubleshooting
Lumps or Uneven Distribution
If, after shaking, your duvet still feels lumpy or seems to have empty spots, don’t worry. This is a common issue that’s easy to fix.
Simply lay the duvet flat on the bed again. Gently pat and smooth the duvet with your hands, working from the center outwards to redistribute the filling. Pay special attention to the corners and edges, ensuring they are plump and full.
Duvet Slipping Inside the Cover
If your duvet insert keeps migrating or clumping despite your best efforts, it’s likely the corner ties aren’t secure enough, or they’re missing altogether. This can be quite annoying during the night.
Go back to Step 4 and ensure all four corners are tightly fastened. If your cover doesn’t have ties, invest in a set of duvet clips or consider sewing simple fabric loops and ties into the corners of your cover and duvet insert respectively. This will keep everything firmly in place.
Difficulty with Buttons or Zippers
Sometimes buttons are stubborn, or a zipper gets stuck, making it hard to close the duvet cover’s opening. This can be a minor annoyance at the final stage.
For buttons, apply firm, even pressure. If a zipper snags, gently wiggle it back and forth without forcing it, then try again. A little fabric softener rubbed on a sticky zipper can also help it glide more smoothly. Ensure the fabric isn’t caught in the mechanism.
Key Takeaways
- The “inside-out roll” method is your secret weapon for an easy duvet change.
- Always secure the duvet insert to the cover’s corner ties to prevent shifting.
- A clear, spacious work area makes the entire process smoother and more enjoyable.
- Take your time with each step; a little patience yields a perfectly made bed.
- A well-fitted duvet and cover are essential for both comfort and a polished look.
- Beyond functionality, a beautifully dressed bed enhances your entire room’s aesthetic.
Frequently Asked Questions
Can I put a duvet cover on by myself?
Absolutely! The “burrito” method described in this guide is specifically designed to be easy for one person. You won’t need an extra set of hands to achieve a perfectly made duvet. It’s all about technique, not brute strength.
How often should I wash my duvet cover?
It’s generally recommended to wash your duvet cover as often as you wash your sheets, which is typically once every one to two weeks. Regular washing keeps your bedding fresh and hygienic, contributing to a clean and inviting sleep environment.
What if my duvet cover doesn’t have corner ties?
If your duvet cover lacks corner ties, you have a few options. You can easily sew simple fabric loops onto the inside corners of your cover and ties onto your duvet. Alternatively, you can purchase duvet clips or fasteners specifically designed to keep the insert in place, providing a quick and effective solution.
Does the type of duvet insert matter for this method?
Not significantly. This method works well for all types of duvet inserts, whether they are down, synthetic, or wool. The key is to ensure your insert and cover are compatible in size. The technique focuses on the mechanics of putting on the cover, regardless of the filling.
Our Top Recommended Finds
- Duvet Cover with Internal Corner Ties: Look for covers that explicitly state they have internal ties. This simple feature is a game-changer for keeping your duvet insert securely in place, preventing frustrating bunching and shifting.
- Duvet Cover Clips or Fasteners: If your current cover lacks ties, these small clips or fasteners are an inexpensive and effective solution. They attach to the corners of both the duvet and the cover, ensuring a snug fit and smooth appearance.
- High-Quality Duvet Insert: Investing in a well-made duvet insert, whether it’s down, down alternative, or another material, significantly enhances comfort. A good insert will maintain its loft and shape, making your bed feel truly luxurious and inviting.
Craft Your Cozy Retreat Today
You now possess the secret to effortlessly dressing your duvet, transforming a once-dreaded chore into a simple, satisfying task.
Think of your bed not just as a place to sleep, but as the anchor of your personal sanctuary, a space designed for ultimate comfort and visual harmony.
With a perfectly made duvet, your bedroom instantly feels more inviting, more polished, and truly your own.
So, why wait? Gather your bedding, apply these easy steps, and elevate your sleep space into the cozy, beautiful haven you deserve. Your future self, nestled in perfect comfort, will thank you.