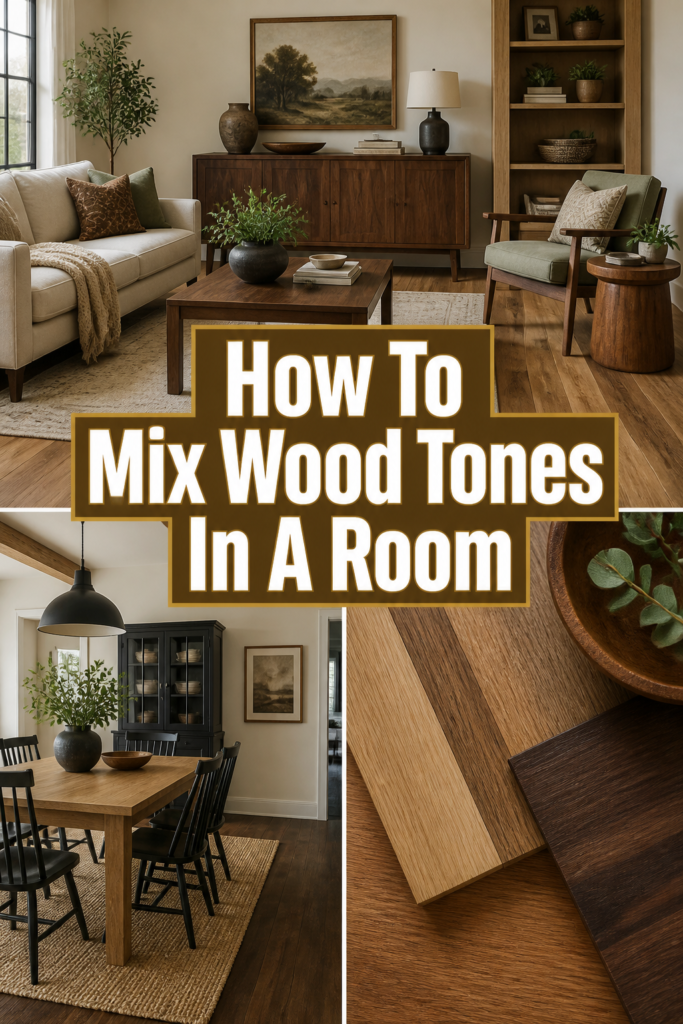
🌳 How To Mix Wood Tones In A Room
There’s a special kind of warmth that wood brings to a home, a natural beauty that feels grounding and inviting.
But sometimes, faced with different pieces – a cherished heirloom table, a modern bookshelf, a new flooring choice – it can feel impossible to make them all sing in harmony.
I’ve helped countless clients transform their spaces from disjointed collections into cohesive, cozy havens, and now I’m sharing those practical, hands-on insights with you.
Quick Overview
This guide will show you how to thoughtfully select and arrange different wood finishes, creating a layered, inviting look that feels intentional and beautiful.
You’ll learn to blend your favorite pieces, making your home feel truly yours.
- Time needed: 2-3 hours for initial planning and assessment, plus shopping time.
- Difficulty: Beginner to Intermediate
- What you’ll need: Inspiration photos, existing wood samples, fabric swatches, a measuring tape, and an open mind.
Step-by-Step Instructions
Step 1: Assess Your Current Wood Collection
Begin by taking stock of all the wood elements already in your room. This includes furniture, flooring, trim, and even decorative accessories.
Walk around the space and truly observe each piece. Notice its color, its grain pattern, and its overall feel.
Pro Tip: Take photos of each wood item in different lighting conditions. This helps you see them more objectively and identify their true undertones.
Step 2: Identify Undertones and Categorize Woods
Woods aren’t just light or dark; they have distinct undertones that are either warm (red, orange, yellow) or cool (gray, blue, green).
Hold a white piece of paper next to each wood item. Does it lean more red (cherry, mahogany), orange (pine, some oaks), yellow (maple, birch), or gray/cool (ash, some walnuts, weathered woods)?
Group your existing woods into categories based on these undertones. You’ll likely find a mix, which is perfectly normal and a great starting point.
Step 3: Choose Your Dominant Wood Tone
Every well-designed room needs a anchor, and your dominant wood tone will serve this purpose. This is usually the largest wood element in the room, like your flooring, a large dining table, or a significant wall unit.
This dominant tone will set the stage for the rest of your wood choices. It doesn’t have to be the darkest or the lightest, just the most prominent.
Once you’ve chosen your dominant piece, consider its undertone. This will guide your selections for complementary woods.
Step 4: Introduce Complementary Wood Tones
Now, select 1-2 additional wood tones that will harmonize with your dominant choice. Aim for contrast in color or depth, but keep the undertones in mind.
If your dominant wood is warm, you can introduce another warm wood that is lighter or darker. You can also bring in a neutral wood (like a natural oak or ash) that bridges warm and cool.
For example, if you have a dark, warm cherry floor, a medium-toned oak table and a light, warm maple accent piece can create beautiful layers.
Step 5: Vary Texture and Grain Patterns
Mixing wood tones isn’t just about color; it’s also about adding visual interest through texture and grain.
A smooth, polished surface offers a different feel than a rustic, wire-brushed finish. A tight, linear grain contrasts with a wide, organic pattern.
Embrace these differences. For instance, pair a sleek, contemporary walnut console with a chunky, reclaimed wood side table. This adds depth and character without clutter.
Step 6: Use Non-Wood Elements as Bridges
Think of textiles, metals, and paint colors as the glue that binds your wood tones together. These elements can act as visual bridges, making disparate woods feel connected.
Choose upholstery, rugs, or wall colors that share an undertone with your woods. For example, a warm beige rug can link a light oak floor to a darker, warmer walnut cabinet.
Metallic accents like bronze, brass, or matte black can also help ground and unify the different wood finishes in a room.
Step 7: Distribute Wood Tones Thoughtfully
Avoid grouping all your light woods in one corner and all your dark woods in another. Instead, spread your chosen wood tones throughout the room.
This creates balance and makes the space feel cohesive and intentional. Your eye should be able to move comfortably from one wood element to another.
For example, if you have a dark wood coffee table, place a lighter wood accent chair or a wooden picture frame on the opposite side of the room.
Step 8: Accessorize with Small Wood Accents
Finally, use smaller wooden accessories to tie everything together and add finishing touches. Think about decorative bowls, picture frames, small sculptures, or even plant stands.
These smaller pieces are perfect for introducing a third or fourth subtle wood tone, or for reinforcing your dominant and complementary choices.
They offer an easy way to experiment and add personality without a large commitment.
Common Mistakes to Avoid
Trying to Match Everything Exactly
A common misconception is that all woods in a room must be identical. This often leads to a flat, uninspired, and sometimes dated look.
Matching every piece perfectly removes the opportunity for depth and visual interest. Embrace variation for a richer, more dynamic space.
Ignoring Undertones
Focusing only on light versus dark can lead to clashing woods. Two woods might be a similar depth but have wildly different undertones (e.g., a cool gray wood next to a warm orange wood).
This creates a jarring effect. Always consider if the woods lean warm, cool, or neutral, and aim for harmony within those categories.
Introducing Too Many Different Tones
While variety is good, too many distinct wood tones can make a room feel chaotic and disjointed. It’s like trying to listen to too many songs at once.
Generally, stick to 2-3 main wood tones, with a few smaller accents. This provides enough variation without overwhelming the eye.
Concentrating All Wood in One Area
If all your wood furniture is clustered together, or if one side of the room is heavily weighted with wood while the other is bare, the room will feel unbalanced.
Distribute your wood elements thoughtfully throughout the space to create visual flow and harmony.
Troubleshooting
My Room Feels Too Busy/Cluttered
If your room feels overwhelmed by wood, you might have too many distinct tones or too many pieces.
Try removing one or two smaller wood accessories, or replace a piece with a painted finish or an upholstered item. Introduce more neutral textiles or solid color elements to provide visual breathing room.
My Room Feels Flat/Monochromatic
If your woods blend together too much, or if you’ve stuck to only one or two very similar tones, the room can lack energy.
Introduce a new wood tone that offers a clear contrast in depth (lighter or darker) or a more distinct grain pattern. You could also bring in more varied textures through fabrics or other materials.
My Woods Still Look Like They’re Clashing
This often comes down to undertones. Even if woods are different depths, their undertones might be fighting (e.g., a strong red wood next to a strong yellow wood without a bridge).
Introduce a neutral element – a rug, throw blanket, or piece of art – that incorporates both undertones subtly. Or, try swapping out one of the clashing wood pieces for something with a more neutral undertone.
Key Takeaways
- Start with Assessment: Understand your existing wood pieces and their unique characteristics.
- Identify Undertones: Recognize if woods lean warm (red, orange, yellow) or cool (gray, blue, green).
- Choose a Dominant Tone: Anchor your design with one primary wood element.
- Limit Main Tones: Aim for 2-3 distinct wood tones for balance and visual interest.
- Vary Texture and Grain: Add depth beyond just color by mixing finishes and patterns.
- Bridge with Neutrals: Use textiles, paint, and metals to connect different wood tones seamlessly.
Frequently Asked Questions
How many wood tones are ideal in one room?
For a cohesive and inviting look, aim for 2-3 primary wood tones. You can then add a few smaller, subtle accents that might introduce a fourth, but keeping the core palette contained prevents a chaotic feel.
Can I mix painted wood with natural wood?
Absolutely! Mixing painted wood with natural wood is a fantastic way to add character and lighten the overall feel of a room. A painted piece can provide a welcome break and allow the natural wood tones to stand out more beautifully.
What about wood floors? Do they count?
Yes, your wood floors are a very significant wood tone in the room. They often serve as your dominant wood, especially if they cover a large area. Always consider them as you plan your furniture and accessory choices.
Should all wood furniture be the same style?
Not at all! Mixing styles, just like mixing tones, adds personality and interest. A modern side table can look wonderful next to a vintage wooden chest, as long as there’s a common thread, like a shared undertone or a unifying non-wood element.
Our Top Recommended Finds
- Wood Stain Sample Kits: Ideal for testing different finishes on scrap wood or small areas, helping you visualize tones before committing to a larger piece.
- Fabric Swatch Books: Invaluable for seeing how different textile colors and textures interact with your wood tones, helping you find those perfect bridging elements.
- Interior Design Inspiration Books: A wonderful source of visual ideas, showing you countless examples of beautifully mixed wood spaces to spark your creativity.
Your Cozy, Cohesive Haven Awaits
Mixing wood tones is a gentle art, not a rigid science. It’s about creating a feeling, a sense of home that is layered, warm, and uniquely yours.
You now have the practical steps and insights to approach this design challenge with confidence. Trust your eye, experiment a little, and most importantly, have fun with the process.
Start today by simply looking at your own space with fresh eyes. Pick one piece of wood furniture you love and build from there. Your beautifully harmonized room is within reach!